My kids love to play Minecraft; it’s a fun game that has remained extremely popular for a decade (a rare feat). Everyone in the family has an account and much of the fun of Minecraft is playing together in a shared world. I will teach you how to setup shared worlds (and back them up) using MineOS software on FreeNAS / TrueNAS.
Step 1: Install MineOS FreeNAS Plugin
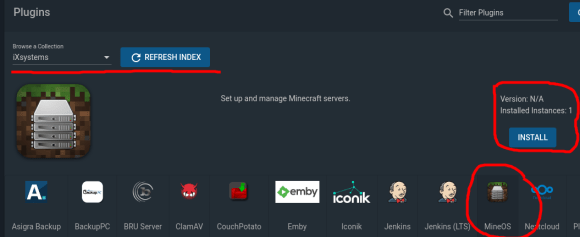
The folks at IXSystems must be big fans of Minecraft because they packaged a Minecraft server solution along with backup utilities and Plex. MineOS is a free plugin to allow you to host Minecraft servers on your FreeNAS box. Within Plugins menu item on FreeNAS web GUI select MineOS and select INSTALL. Give it a name, I chose mineos and select plugin details >>> mostly select DHCP vs. NAT for networking. DHCP will create a fresh Jail, use DHCP to configure networking and install the MineOS software.
If your plugin installation is successful it will look similar to the above image. Note the IPv4 address and click the Manage link to be redirected to the MineOS login page. The default username is mcserver and the default password is mcserver.
When you login, you should see a web GUI similar to the above. In this example I have two (2) servers running. Your example will show no servers running (which is totally ok!). The Dashboard link (circled above) will return you to this menu for any point in MineOS.
Why MineOS?
MineOS is an open source project from William Dizon (looks like it’s been around since 2010). Essentially a Web GUI for administering your Minecraft servers along with utilities to backup and upgrade your world. It’s useful to move an server or daemon process off you local host or laptop to provide improved resiliency and uptime and allow for dedicated resources. You can also setup port forwarding on your wifi router along with a dynamic dns name to allow folks from outside your local area network (LAN) to connect to your Minecraft server. MineOS also allows you to upgrade your world from various versions of Minecraft releases and try out new exciting systems like direwolf and feed the beast (more on this later).
Step 2: Download Server Profile Jars
Minecraft Java Edition is packaged and released as Java Archive (JAR) files from Mojang.com. Your Minecraft launcher application on Windows, Mac or Linux will automation this download when you select the game version. In MineOS you will need to click on the Profiles menu item (on the left), select Mojang from the ID column and then click the Green Download button. You know that you are successful if you see the check and Downloaded next to the Jars you requested. Be careful and do not try and get every Jar at once; the Web GUI doesn’t have a throttle.
If you have errors Downloading Server Jars, do the following:
Stop and Start the Mineos Jail in FreeNAS. Sometimes, I’ve seen it where the networking (to the outside world) doesn’t work correctly the first time. I don’t think this is a problem anymore but worth trying.
Make sure you know where Mineos is trying to save those Jars and that you have write access and enough space. We’ll get into customizing where these Jars are saved in a later article.
Step 3: Create Your First Server
Back on the MineOS menu, please select the “Create New Server” menu item. You will be presented with a dialog to name the server; I chose the name of server01 (boring, I know). All fields with light-gray text will default to those values, i.e. the port will be set to 25565 (which is the default for Minecraft). You might want to change the Level-Name to something interesting. Set the difficulty and gamemode and click create new server. Please note it doesn’t actually start the server yet (we’ll do that next) and most if not all these items can be changed with the exception of the server name.
Step 4: Start Your First Minecraft Server
In the MineOS web GUI go back to the Dashboard and select the server you created.
The Server At A Glance dashboard is very informational. If the server is down, as it will be initially, the server status will be RED. In the Server Actions box, you need to choose the Minecraft server profile you downloaded from Step 2 (in this case 1.16.3). You should ensure that broadcast to LAN and start server on boot checkboxes are checked. In the Java settings you need to select the JAR file from Step 2 (in this case minecraft_server.1.16.3.jar. I like to set the max Java heap (memory) size on the Java runtime to between 1024 and 2048 Mb (1 to 2 Gb). -Xms means minimum Heap size; it’s ok to leave that blank.
Then click Accept EULA and click start to run the server.
If all goes well your Server should show up on the status page and if you click on the latest log link on the left you should see something similar to the below
In your Minecraft Java client you should select Multiplayer and add the server IP that your MineOS is running on to connect to the server (in this case 192.168.1.12). Once you connect, the latest log will show a connection log message for each player. Enjoy!
I’ve been a loyal TiVo customer for more than 16 years which feels awkward to type. TiVo never really cracked into the mainstream, it has always been a premium product and it has since gone thru many acquisitions and CEOs in recent years. I currently own a TiVo Bolt and several TivoHDs. The TiVo is a DVR (Digital Video Recorder) which is a market they practically invented along with a competitor named ReplayTV. I’m not a heavy television watcher but I do watch sports and particularly NHL Hockey. The TiVo can setup a “season pass” on a particular sports team and record all games (i.e. Dallas Stars). My TiVo Bolt has a 500 GB internal HD which is capable of holding many dozens of shows; the Dallas Stars are on a historic Stanley Cup run and I wanted to archive some games for watching later / posterity. The TiVo has native Plex App support so I wondered if I could pull the recorded MPEG shows off the TiVo and archive them in a Sports Plex Library on my FreeNAS server(which has many TBs of storage and ZFS!).
Update 25-Oct-20: The Dallas Stars lost the cup to the Tampa Bay Lightning in 6 games. It was exciting hockey and I’m sure glad I have the series on my Plex. I’m excited for next season, looks like we’ve signed most the team back with the exception of Corey Perry and Matthias Janmark.
Step 1: The Fair Use Doctrine
Am I legally allowed to record and save a show from my TiVo to the Plex? Accord to the Fair Use Doctrine the answer is yes.
I can legally record a broadcast TV program (from a Cable TV feed I pay a monthly fee for) on a recording device such as a Video Cassette Recorder, Digital Video Recorder or computer for my personal use. Recording programming for later viewing is called “Time Shifting” and is a legally supported act. I can view the recorded content as many times as I want, I can make additional copies of the recorded content and I can distribute copies of the content to other people in person. Educational uses of recorded TV content receive additional protection. It is legal to record a TV program and play it for a class. I can also edit and parody the recorded content as long as the new version adds new value (insight, understanding, aesthetics) to the original.
I can’t hold public exhibitions, rebroadcast, distribute on peer-to-peer networks or sell a TV broadcast recording. Fair use does not protect mass distribution of recorded content or the ability for a person to make a financial profit from a copyrighted recording.
The TV recording copyright laws for the U.S. are rooted in the Sony Corporation V. Universal City Studios court case–commonly known as the beta max case. The Supreme Court determined that “video tape recorders” did not infringe on the TV programming copyrights and the potential financial loss to copyright holders from TV recording would be negligible. The case made it legal to produce and sell TV recording devices and for people in the U.S. to record TV programming.
Step 2: How Do I get my Shows off the TiVo?
Let me introduce you to a wonderful little piece of software called pyTivo. This open source software which is not affiliated in any way with TiVo, Inc provides similar functionality to the TiVo Desktop software for Micro$oft Windows and Apple Macintosh. Namely this software allowed you to push and pull MPEG video files from my TiVo and I have been a happy user for over 10 years. The software runs on a host (or a NAS or wifi-router) on your local area network and listens via multi-cast IP for connected TiVo devices. The software is very simple to install and very light requiring only Python, ffmpeg (to transcode) and the tivodecode utility to decrypt TiVo video files. I setup a Jail on my FreeNAS 11.3 server where I wanted to install pyTivo. I had previously setup a share called sports on my medialibrary directory on my NAS pool. I kept the sports folder seperate from Movies or Television on the Plex and in the medialibrary since Plex expects a certain naming structure for Television shows or Movies. I installed the required software:
rich@kidney$ pkg add ffmpeg git tivodecode
rich@kidney$ cd ~/
rich@kidney$ git clone git://repo.or.cz/pyTivo/wmcbrine.git
rich@kidney$ mv wmcbrine pyTivo
rich@kidney$ cd pyTivo
rich@kidney$ cp pyTivo.conf.dist pyTivo.conf
rich@kidney$ vi pyTivo.conf
rich@kidney$ ./pyTivo.py
Step 3: Configuration of pyTivo and First Download
Jot down the IP address of the Jail you configured in Step 2. Fire up your favorite web browser and head over to that address and port 9032 (which is the default, you can change this). The pyTivo user interface is very simplistic. It will initially only show you a Settings link which you must configure for first use.
I’ve circled the most important settings and how I’ve configured them. The paths to ffmpeg and tivodecode and tdcat binaries must resolve. You can test the fully qualified path names to those binaries on the FreeNAS ssh command line. Please note that I compiled a fresh version of tdcat and tivodecode from wcmcbrines git repo as the stock FreeBSD tivodecode binary seg faulted for me. I set my beacon address to the multi-cast for my local subnet and I ensured that my FreeNAS box was on the same local subnet as my TiVos. The togo_path is important. This is where all shows downloaded from the TiVo will be saved local to the pyTivo installation. As previously mentioned I created a sports mount point to my medialibrary share on my ZFS pool. Lastly, I filled in the TiVo MAK (Media Access Key) for my particular account. This is a secret key used to decrypt shows recorded on my personal TiVo — Do not share this key! You can find your MAK on tivo.com when you login to your account. Save changes and restart your pyTivo to ensure changes take affect. Make sure on the command line that pyTivo.conf has been updated with the information you input in the Settings menu. When you restart pyTivo you should see a listing of your TiVo’s and if you input a correct MAK key then you should be able to connect and browse a listing of shows on the Tivo.
If you click on a folder you should see a listing of shows with a description of each one along with the runtime, the file size and the date it was recorded. The exclamation point next to each show means these shows will be deleted shortly as needed for space. Remember: I only have a 500 GB model…
So, each Dallas Stars hockey game is 3.5 to 4 hours and it’s about 7 GB of 720p video recorded at 4 Mbs. I can of course play around with how this is recorded on the TiVo Bolt itself but this seems to be a good compromise of space/size vs. quality. Honestly I want to avoid any transcoding and just focus on decrypting and downloading to the NAS.
Click the check next to each show you want to download and check the bottom boxes to decrypt, save meta data and transfer as mpeg-ts. As far as I understand the mpeg-ts doesn’t transcode and just copies the raw file from the TiVo.
Rename each file and add .mpg extension; the text file will contain meta data for the video.
Quick Update 23-Sep-20: You don’t need to rename the file extension to .mpg for the Plex file scanner to “see” the video files. Just make sure the file permissions allow Plex at minimum to read the file. A simple check of chmod 777 could help spot if that is the issue. The file will come into Plex with the default filename as the Title. You can “enrich” this information manually in the Plex UI if you wish. Plex seem to take 3 or so stills from the video file to use as the poster in Plex. These seem to be fine for me in most cases.
Step 4: Add Tivo function user to run PyTivo Jail
In the FreeNAS web console, select Accounts and Users and click on the Add button. Fill in the new user details, in my case I created the user tivo and most important set the UID (user id) to a unique number higher than 1000. In my case I chose uid 1010. Next set the group for the tivo function user to something that you use with your media, in my case the media group. You can setup a home directory if you wish (it’s not necessary). Click save to create that user.
Ssh into your tivo FreeNAS Jail using the following command
root@kidney$ jls tivo
root@kidney$ sudo jexec 8 /bin/tcsh  <<whereas 8 is your tivo jail id>>

root@tivo$ whoami
Now that you are in your Tivo jail as a the root user which you can see from the command line. Users and groups created within a FreeNAS jail are only visible in that jail. Meaning you can create users here but they are unique to that jail and are not in your overall FreeNAS system. But, you can create a new user in the jail and use the same UID and GID as the users and groups you setup in the overall FreeNAS system. That way any file saved will show tivo and group media in both the Jail and in FreeNAS and via shares. To do this run the following commands within the Tivo jail:
root@tivo:/mnt/sports # pw groupadd media -g 8675309
root@tivo:/mnt/sports # pw groupshow media
media:*:8675309:


root@tivo:/mnt/sports # adduser
Username: tivo
Full name: TiVo Functional User
Uid (Leave empty for default): 1010
Login group [tivo]: media
Login group is media. Invite tivo into other groups? []:
Login class [default]:
Shell (sh csh tcsh git-shell nologin) [sh]:
Home directory [/home/tivo]:
Home directory permissions (Leave empty for default):
Use password-based authentication? [yes]:
Use an empty password? (yes/no) [no]:
Use a random password? (yes/no) [no]:
Enter password:
Enter password again:
Lock out the account after creation? [no]:
Username   : tivo
Password   : *****
Full Name  : TiVo Functional User
Uid        : 1010
Class      :
Groups     : media
Home       : /home/tivo
Home Mode  :
Shell      : /bin/sh
Locked     : no
OK? (yes/no): yes
adduser: INFO: Successfully added (tivo) to the user database.
Add another user? (yes/no): no
Goodbye!
In the above instance I had already created a media group in FreeNAS with 8675309 as the group id (I guess I was in a comical mood that day! Jenny Jenny … lol ).
Step 5: Setting pyTivo process to Autostart as tivo user
Update: 25-Oct-20: This one took me a bit of time to figure out. I followed this guide which was written for another python program called octoprint. In the guide they talk about writing an rc script to start the program and in particular to run it as a daemon. I did a bit of tinkering and I got it to work with pyTivo. Please note that pyTivo currently still needs python 2.7.
The rc script with the above content was saved in /usr/local/etc/rc.d as pytivod and I made sure to set the script as executable. I also made sure that pytivod_enable=”YES” is in the /etc/rc.conf file within the Jail. Restart the Jail and check that the process has auto-started and that the process is running as the tivo user. This is really, really important for me as I want all files to be owned by tivo:media on the TrueNAS and I can set the plex user and the tivo user to be in the media group so they have read/write access to those files.
Step 6: Add Plex Library for Other Videos
In your Plex web user interface add a new Video Library, make sure you choose other videos. I named the library sports for NHL and MLB games. In the Plex user interface you can scan for new media files and update the title and other details from the meta data text file. In the Other Videos category it’s really very simple and it doesn’t scan and enrich the filenames. I will need to add a renamer function to add series name and episode number to the filename of the files if I want a more seamless “Television Shows” experience on Plex. I’m still working on that part and I’ll update this posting when I get somewhere with that.