Graylog is an enterprise log aggregation and management framework similar to Splunk. Graylog, the company, is based in Houston, Texas (yay!) and boasts over 40k installations. What am I trying to accomplish by using Graylog at home? Well, my initial requirement is to collect logs from my network routers and incorporate that into my existing network monitoring using InfluxDB and Grafana. I’m a client of Comcast Xfinity and my network performance has really been poor in mid to late 2020. After multiple calls to Comcast and several tech visits, I’ve setup my own monitoring to “show” Comcast that I’m not getting the bandwidth they are billing me for. Log retention is low on my routers and cable modem (data rolls off quickly), a goal of this project is to retain at least 30-90 days of log messages from all network devices.
I’ll setup Graylog in a TrueNAS Core 12.0 Jail which will be running FreeBSD 12.2 release. The jail configuration isolates the software and configuration from other applications running on TrueNAS and it provides a stable environment with a large storage pool for log retention. In the Jails menu on TrueNAS Core 12.0, select the add button and the wizard will prompt you for input to create the Jail. Name your jail graylog and select the FreeBSD software release, then hit Next. I chose DHCP for my Networking configuration which will allow me easy SSH access to the “host”. Select Next and then select Submit to create the Jail. This tutorial will assume you have an understanding of basic Unix and SSH commands. After the wizard completes, you will want to click on the greater-than symbol in the graylog jail row in TrueNAS to show the jail details including the IP address. In this instance my graylog jail is 192.168.1.32 (take note!). In my network router I configured DHCP to give the same IP4 address to the MAC address for the graylog jail and to resolve the DNS hostname of graylog (so I don’t need to remember the IP4 address)
Test that the jail is up by pinging the “host”
rich@eragon:~$ ping graylog
PING graylog.pavlovs.ky (192.168.1.32) 56(84) bytes of data.
64 bytes from graylog.pavlovs.ky (192.168.1.32): icmp_seq=1 ttl=64 time=0.691 ms
64 bytes from graylog.pavlovs.ky (192.168.1.32): icmp_seq=2 ttl=64 time=0.619 ms
64 bytes from graylog.pavlovs.ky (192.168.1.32): icmp_seq=3 ttl=64 time=0.684 ms
64 bytes from graylog.pavlovs.ky (192.168.1.32): icmp_seq=4 ttl=64 time=0.752 ms
64 bytes from graylog.pavlovs.ky (192.168.1.32): icmp_seq=5 ttl=64 time=0.537 ms
^C
--- graylog.pavlovs.ky ping statistics ---
5 packets transmitted, 5 received, 0% packet loss, time 4006ms
rtt min/avg/max/mdev = 0.537/0.656/0.752/0.073 ms
Step 2: Setup SSH access and a local user
You will need to ssh into your TrueNAS box and use the iocage or the jexec command to remote into the jail on your first access. This is because you won’t have a local user account yet and the SSH daemon isn’t running. SSH into your TrueNAS (mine is named kidney) and type the JLS command to see the JID number of your jail. This will change with every restart so don’t write it down or memorize it. Use the jexec command to remote in.
kidney% jls
   JID  IP Address      Hostname                      Path
    12                  graylog                       /mnt/PavPool/iocage/jails/graylog/root
kidney% sudo jexec 12 /bin/tcsh

We trust you have received the usual lecture from the local System
Administrator. It usually boils down to these three things:

    #1) Respect the privacy of others.
    #2) Think before you type.
    #3) With great power comes great responsibility.

Password:
root@graylog:/ #
You will notice that you are now in a shell (a tcsh shell if you followed my above instructions) in the jail. Please note bash is not installed yet. You will be logged in as root. Update the packages and install bash first; you will need bash when you create your local user. You will also install the sudo package and configure it. sudo allows non-root users to run privileged commands.
root@graylog:/ # pkg update
Updating FreeBSD repository catalogue...
FreeBSD repository is up to date.
All repositories are up to date.
root@graylog:/ # pkg install bash sudo
Now you need to configure sudo by executing the visudo command. This command will edit the sudoers file to tell the system that your local account is allowed to run priveliged commands. Scroll down in the vi window until you see User Privilege
##
## User privilege specification
##
root ALL=(ALL) ALL
You should add a new row by putting cursor under the row with root like above and hitting the i key to insert. Type your user row as follows:
rich ALL=(ALL) ALL
Substitute username rich for whatever your username is. You may wonder that you haven’t created the user yet and that is ok! We will create the user next. Type SHIFT ZZ (that is hold the shift key and then type Z twice) to save the file.
Then, add your local user to enable easy logins as something other than root (not good to remote into things as root). In this example my local login name is rich with unix id of 1000 on all my boxes including TrueNAS <<< this is important. Type adduser to create the rich user with uid of 1000.
root@graylog:/ # adduser
Username: rich_
Full name: Rich P
Uid (Leave empty for default): 1000
Login group [rich_]:
Login group is rich_. Invite rich_ into other groups? []:
Login class [default]:
Shell (sh csh tcsh bash rbash git-shell nologin) [sh]: bash
Home directory [/home/rich_]:
Home directory permissions (Leave empty for default):
Use password-based authentication? [yes]:
Use an empty password? (yes/no) [no]:
Use a random password? (yes/no) [no]:
Enter password:
Next, edit the /etc/rc.conf file and add this line to the end of the file
sshd_enable="YES"
Next, start the sshd service to test that it works
root@graylog:/ # service sshd start
Now, try to ssh into your TrueNAS jail from your localhost
rich@eragon:~$ ssh graylog
Password for rich@graylog:
Last login: Fri Dec  4 18:11:47 2020 from eragon.pavlovs.ky
FreeBSD 12.2-RC3 7c4ec6ff02c(HEAD) TRUENAS

Welcome to FreeBSD!
To make it more secure you can add an SSO component or add ssh keys to each of your jails (i.e. no more typing your password). You should have convenient SSH access to your jail. Remember, with great power comes great responsibility. Also remember that you are no longer logging in as root so you’ll need to run sudo on privileged commands. Sudo should be all setup and we’ll test it in the next step.
Step 3: Install Graylog Packages
Type the following to install the graylog, elasticsearch and mongodb packages.
[rich@graylog ~]$ sudo pkg update
Updating FreeBSD repository catalogue...
FreeBSD repository is up to date.
All repositories are up to date.

[rich@graylog ~]$ sudo pkg install graylog elasticsearch6 mongodb44
Update 14-Dec: Updated post based on comments/feedback. I had made a mistake on the packages I used, which was corrected by a reader.
It may take a few mins to download and install those packages. MongoDB will be used for the graylog configuration only. All log data will be stored in the elasticsearch cluster. These packages are downloaded from FreeBSD fresh ports which is a very extensive software pkg repository. Please note as of this writing in Dec 2020, version 3.3.1 is the latest FreeBSD graylog package available but graylog itself is shipping version 4.0.2 on the graylog.org website.
Step 4: Configure Software
None of the above software will be running after it’s installation. Don’t start the services yet. First, edit /etc/rc.conf to tell TrueNAS to autostart the software when the jail starts. Add these lines to the end of the file.
Next, edit the /usr/local/etc/elasticsearch/elasticsearch.yml file to change a few parameters. Add the following to the bottom of the file and save it.
cluster.name: graylog
Start the mongoDB and the elasticsearch components by typing:
[rich@graylog ~]$ sudo service elasticsearch start

[rich@graylog ~]$ sudo service mongod start
Notice the output of the above service commands, if there are any errors starting the commands it should prompt you. You can check if both services are running by typing a netstat command.
This command shows which TCP ports are being listened to by server processes like mongo and elasticsearch. You will notice that 9200 and 9300 are elasticsearch. 22 is SSHD and 27017 is mongo. If your output from a netstat is similar then you are doing good so far. Now, we need to configure graylog and then start the service for the first time. The graylog config will be in the /usr/local/etc/graylog directory.
This will setup the initial config directory and change the owner of the files to graylog user and graylog group. That user and group should have been created when you pkg installed graylog. If you don’t have that user or group then go back to the package install step and check you did that correctly. Change directory back to /usr/local/etc/graylog and edit the graylog.conf file and ensure the variables are set as such.
The above config parameters are scattered throughout the config file. Your http_bind_address will be the jail ip4 address. Ensure that all those directories like the journal directory exist and are owned by graylog:graylog. Next, set the hashed admin password and seed by running these two commands on the command line.
Edit the graylog.conf file and follow the instructions to paste the password_seed and root_password_sha2 to set those values and then save the file. There are instructions inline in the conf file on the password seed and root password if you are confused. Make sure the file is only readable to the graylog user and group. Now you can finally start the Graylog service
Tail the /var/log/graylog/server.log file to ensure it starts correctly and no fatal errors. It takes a minute or two to startup.
Step 5: Test Jail Restart to Ensure Auto-Launch
If graylog started up correctly, go ahead and stop the jail in the TrueNAS Jails menu. Click the Edit Jail menu item under the graylog jail properties and in the Basic Properties sheet you will check the Auto-start checkbox and click save. Next you can click the start button on the graylog jail and wait a few min for everything to start up. You then should be able to access the graylog UI at http://<your ip address>:9000 (please note that you need to fill in your ip address and it will be different than mine.)
Further tutorials will include hardening + adding SSL and configuring syslog inputs.
My kids love to play Minecraft; it’s a fun game that has remained extremely popular for a decade (a rare feat). Everyone in the family has an account and much of the fun of Minecraft is playing together in a shared world. I will teach you how to setup shared worlds (and back them up) using MineOS software on FreeNAS / TrueNAS.
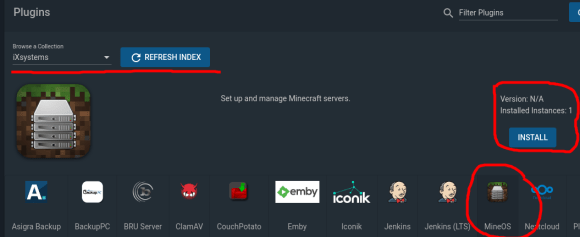
Step 1: Install MineOS FreeNAS Plugin
The folks at IXSystems must be big fans of Minecraft because they packaged a Minecraft server solution along with backup utilities and Plex. MineOS is a free plugin to allow you to host Minecraft servers on your FreeNAS box. Within Plugins menu item on FreeNAS web GUI select MineOS and select INSTALL. Give it a name, I chose mineos and select plugin details >>> mostly select DHCP vs. NAT for networking. DHCP will create a fresh Jail, use DHCP to configure networking and install the MineOS software.
If your plugin installation is successful it will look similar to the above image. Note the IPv4 address and click the Manage link to be redirected to the MineOS login page. The default username is mcserver and the default password is mcserver.
When you login, you should see a web GUI similar to the above. In this example I have two (2) servers running. Your example will show no servers running (which is totally ok!). The Dashboard link (circled above) will return you to this menu for any point in MineOS.
Why MineOS?
MineOS is an open source project from William Dizon (looks like it’s been around since 2010). Essentially a Web GUI for administering your Minecraft servers along with utilities to backup and upgrade your world. It’s useful to move an server or daemon process off you local host or laptop to provide improved resiliency and uptime and allow for dedicated resources. You can also setup port forwarding on your wifi router along with a dynamic dns name to allow folks from outside your local area network (LAN) to connect to your Minecraft server. MineOS also allows you to upgrade your world from various versions of Minecraft releases and try out new exciting systems like direwolf and feed the beast (more on this later).
Step 2: Download Server Profile Jars
Minecraft Java Edition is packaged and released as Java Archive (JAR) files from Mojang.com. Your Minecraft launcher application on Windows, Mac or Linux will automation this download when you select the game version. In MineOS you will need to click on the Profiles menu item (on the left), select Mojang from the ID column and then click the Green Download button. You know that you are successful if you see the check and Downloaded next to the Jars you requested. Be careful and do not try and get every Jar at once; the Web GUI doesn’t have a throttle.
If you have errors Downloading Server Jars, do the following:
Stop and Start the Mineos Jail in FreeNAS. Sometimes, I’ve seen it where the networking (to the outside world) doesn’t work correctly the first time. I don’t think this is a problem anymore but worth trying.
Make sure you know where Mineos is trying to save those Jars and that you have write access and enough space. We’ll get into customizing where these Jars are saved in a later article.
Step 3: Create Your First Server
Back on the MineOS menu, please select the “Create New Server” menu item. You will be presented with a dialog to name the server; I chose the name of server01 (boring, I know). All fields with light-gray text will default to those values, i.e. the port will be set to 25565 (which is the default for Minecraft). You might want to change the Level-Name to something interesting. Set the difficulty and gamemode and click create new server. Please note it doesn’t actually start the server yet (we’ll do that next) and most if not all these items can be changed with the exception of the server name.
Step 4: Start Your First Minecraft Server
In the MineOS web GUI go back to the Dashboard and select the server you created.
The Server At A Glance dashboard is very informational. If the server is down, as it will be initially, the server status will be RED. In the Server Actions box, you need to choose the Minecraft server profile you downloaded from Step 2 (in this case 1.16.3). You should ensure that broadcast to LAN and start server on boot checkboxes are checked. In the Java settings you need to select the JAR file from Step 2 (in this case minecraft_server.1.16.3.jar. I like to set the max Java heap (memory) size on the Java runtime to between 1024 and 2048 Mb (1 to 2 Gb). -Xms means minimum Heap size; it’s ok to leave that blank.
Then click Accept EULA and click start to run the server.
If all goes well your Server should show up on the status page and if you click on the latest log link on the left you should see something similar to the below
In your Minecraft Java client you should select Multiplayer and add the server IP that your MineOS is running on to connect to the server (in this case 192.168.1.12). Once you connect, the latest log will show a connection log message for each player. Enjoy!
I’ve been a loyal TiVo customer for more than 16 years which feels awkward to type. TiVo never really cracked into the mainstream, it has always been a premium product and it has since gone thru many acquisitions and CEOs in recent years. I currently own a TiVo Bolt and several TivoHDs. The TiVo is a DVR (Digital Video Recorder) which is a market they practically invented along with a competitor named ReplayTV. I’m not a heavy television watcher but I do watch sports and particularly NHL Hockey. The TiVo can setup a “season pass” on a particular sports team and record all games (i.e. Dallas Stars). My TiVo Bolt has a 500 GB internal HD which is capable of holding many dozens of shows; the Dallas Stars are on a historic Stanley Cup run and I wanted to archive some games for watching later / posterity. The TiVo has native Plex App support so I wondered if I could pull the recorded MPEG shows off the TiVo and archive them in a Sports Plex Library on my FreeNAS server(which has many TBs of storage and ZFS!).
Update 25-Oct-20: The Dallas Stars lost the cup to the Tampa Bay Lightning in 6 games. It was exciting hockey and I’m sure glad I have the series on my Plex. I’m excited for next season, looks like we’ve signed most the team back with the exception of Corey Perry and Matthias Janmark.
Step 1: The Fair Use Doctrine
Am I legally allowed to record and save a show from my TiVo to the Plex? Accord to the Fair Use Doctrine the answer is yes.
I can legally record a broadcast TV program (from a Cable TV feed I pay a monthly fee for) on a recording device such as a Video Cassette Recorder, Digital Video Recorder or computer for my personal use. Recording programming for later viewing is called “Time Shifting” and is a legally supported act. I can view the recorded content as many times as I want, I can make additional copies of the recorded content and I can distribute copies of the content to other people in person. Educational uses of recorded TV content receive additional protection. It is legal to record a TV program and play it for a class. I can also edit and parody the recorded content as long as the new version adds new value (insight, understanding, aesthetics) to the original.
I can’t hold public exhibitions, rebroadcast, distribute on peer-to-peer networks or sell a TV broadcast recording. Fair use does not protect mass distribution of recorded content or the ability for a person to make a financial profit from a copyrighted recording.
The TV recording copyright laws for the U.S. are rooted in the Sony Corporation V. Universal City Studios court case–commonly known as the beta max case. The Supreme Court determined that “video tape recorders” did not infringe on the TV programming copyrights and the potential financial loss to copyright holders from TV recording would be negligible. The case made it legal to produce and sell TV recording devices and for people in the U.S. to record TV programming.
Step 2: How Do I get my Shows off the TiVo?
Let me introduce you to a wonderful little piece of software called pyTivo. This open source software which is not affiliated in any way with TiVo, Inc provides similar functionality to the TiVo Desktop software for Micro$oft Windows and Apple Macintosh. Namely this software allowed you to push and pull MPEG video files from my TiVo and I have been a happy user for over 10 years. The software runs on a host (or a NAS or wifi-router) on your local area network and listens via multi-cast IP for connected TiVo devices. The software is very simple to install and very light requiring only Python, ffmpeg (to transcode) and the tivodecode utility to decrypt TiVo video files. I setup a Jail on my FreeNAS 11.3 server where I wanted to install pyTivo. I had previously setup a share called sports on my medialibrary directory on my NAS pool. I kept the sports folder seperate from Movies or Television on the Plex and in the medialibrary since Plex expects a certain naming structure for Television shows or Movies. I installed the required software:
rich@kidney$ pkg add ffmpeg git tivodecode
rich@kidney$ cd ~/
rich@kidney$ git clone git://repo.or.cz/pyTivo/wmcbrine.git
rich@kidney$ mv wmcbrine pyTivo
rich@kidney$ cd pyTivo
rich@kidney$ cp pyTivo.conf.dist pyTivo.conf
rich@kidney$ vi pyTivo.conf
rich@kidney$ ./pyTivo.py
Step 3: Configuration of pyTivo and First Download
Jot down the IP address of the Jail you configured in Step 2. Fire up your favorite web browser and head over to that address and port 9032 (which is the default, you can change this). The pyTivo user interface is very simplistic. It will initially only show you a Settings link which you must configure for first use.
I’ve circled the most important settings and how I’ve configured them. The paths to ffmpeg and tivodecode and tdcat binaries must resolve. You can test the fully qualified path names to those binaries on the FreeNAS ssh command line. Please note that I compiled a fresh version of tdcat and tivodecode from wcmcbrines git repo as the stock FreeBSD tivodecode binary seg faulted for me. I set my beacon address to the multi-cast for my local subnet and I ensured that my FreeNAS box was on the same local subnet as my TiVos. The togo_path is important. This is where all shows downloaded from the TiVo will be saved local to the pyTivo installation. As previously mentioned I created a sports mount point to my medialibrary share on my ZFS pool. Lastly, I filled in the TiVo MAK (Media Access Key) for my particular account. This is a secret key used to decrypt shows recorded on my personal TiVo — Do not share this key! You can find your MAK on tivo.com when you login to your account. Save changes and restart your pyTivo to ensure changes take affect. Make sure on the command line that pyTivo.conf has been updated with the information you input in the Settings menu. When you restart pyTivo you should see a listing of your TiVo’s and if you input a correct MAK key then you should be able to connect and browse a listing of shows on the Tivo.
If you click on a folder you should see a listing of shows with a description of each one along with the runtime, the file size and the date it was recorded. The exclamation point next to each show means these shows will be deleted shortly as needed for space. Remember: I only have a 500 GB model…
So, each Dallas Stars hockey game is 3.5 to 4 hours and it’s about 7 GB of 720p video recorded at 4 Mbs. I can of course play around with how this is recorded on the TiVo Bolt itself but this seems to be a good compromise of space/size vs. quality. Honestly I want to avoid any transcoding and just focus on decrypting and downloading to the NAS.
Click the check next to each show you want to download and check the bottom boxes to decrypt, save meta data and transfer as mpeg-ts. As far as I understand the mpeg-ts doesn’t transcode and just copies the raw file from the TiVo.
Rename each file and add .mpg extension; the text file will contain meta data for the video.
Quick Update 23-Sep-20: You don’t need to rename the file extension to .mpg for the Plex file scanner to “see” the video files. Just make sure the file permissions allow Plex at minimum to read the file. A simple check of chmod 777 could help spot if that is the issue. The file will come into Plex with the default filename as the Title. You can “enrich” this information manually in the Plex UI if you wish. Plex seem to take 3 or so stills from the video file to use as the poster in Plex. These seem to be fine for me in most cases.
Step 4: Add Tivo function user to run PyTivo Jail
In the FreeNAS web console, select Accounts and Users and click on the Add button. Fill in the new user details, in my case I created the user tivo and most important set the UID (user id) to a unique number higher than 1000. In my case I chose uid 1010. Next set the group for the tivo function user to something that you use with your media, in my case the media group. You can setup a home directory if you wish (it’s not necessary). Click save to create that user.
Ssh into your tivo FreeNAS Jail using the following command
root@kidney$ jls tivo
root@kidney$ sudo jexec 8 /bin/tcsh  <<whereas 8 is your tivo jail id>>

root@tivo$ whoami
Now that you are in your Tivo jail as a the root user which you can see from the command line. Users and groups created within a FreeNAS jail are only visible in that jail. Meaning you can create users here but they are unique to that jail and are not in your overall FreeNAS system. But, you can create a new user in the jail and use the same UID and GID as the users and groups you setup in the overall FreeNAS system. That way any file saved will show tivo and group media in both the Jail and in FreeNAS and via shares. To do this run the following commands within the Tivo jail:
root@tivo:/mnt/sports # pw groupadd media -g 8675309
root@tivo:/mnt/sports # pw groupshow media
media:*:8675309:


root@tivo:/mnt/sports # adduser
Username: tivo
Full name: TiVo Functional User
Uid (Leave empty for default): 1010
Login group [tivo]: media
Login group is media. Invite tivo into other groups? []:
Login class [default]:
Shell (sh csh tcsh git-shell nologin) [sh]:
Home directory [/home/tivo]:
Home directory permissions (Leave empty for default):
Use password-based authentication? [yes]:
Use an empty password? (yes/no) [no]:
Use a random password? (yes/no) [no]:
Enter password:
Enter password again:
Lock out the account after creation? [no]:
Username   : tivo
Password   : *****
Full Name  : TiVo Functional User
Uid        : 1010
Class      :
Groups     : media
Home       : /home/tivo
Home Mode  :
Shell      : /bin/sh
Locked     : no
OK? (yes/no): yes
adduser: INFO: Successfully added (tivo) to the user database.
Add another user? (yes/no): no
Goodbye!
In the above instance I had already created a media group in FreeNAS with 8675309 as the group id (I guess I was in a comical mood that day! Jenny Jenny … lol ).
Step 5: Setting pyTivo process to Autostart as tivo user
Update: 25-Oct-20: This one took me a bit of time to figure out. I followed this guide which was written for another python program called octoprint. In the guide they talk about writing an rc script to start the program and in particular to run it as a daemon. I did a bit of tinkering and I got it to work with pyTivo. Please note that pyTivo currently still needs python 2.7.
The rc script with the above content was saved in /usr/local/etc/rc.d as pytivod and I made sure to set the script as executable. I also made sure that pytivod_enable=”YES” is in the /etc/rc.conf file within the Jail. Restart the Jail and check that the process has auto-started and that the process is running as the tivo user. This is really, really important for me as I want all files to be owned by tivo:media on the TrueNAS and I can set the plex user and the tivo user to be in the media group so they have read/write access to those files.
Step 6: Add Plex Library for Other Videos
In your Plex web user interface add a new Video Library, make sure you choose other videos. I named the library sports for NHL and MLB games. In the Plex user interface you can scan for new media files and update the title and other details from the meta data text file. In the Other Videos category it’s really very simple and it doesn’t scan and enrich the filenames. I will need to add a renamer function to add series name and episode number to the filename of the files if I want a more seamless “Television Shows” experience on Plex. I’m still working on that part and I’ll update this posting when I get somewhere with that.
Documentation is terrible; it’s all about getting and installing mineos. It says nothing about using mineos! I had to do a lot of trial and error last night. I compiled sphigot — I had no idea what it did. I had to read up separately what it did. It looks to be a more efficient Minecraft server. I’m game so I set it up on a sever 15.2 running survival mode. I setup another server for Abby running forge so her mods could be installed. I haven’t gotten any mods yet I was just focused on getting it up and running. Lastly. Installed a third server running feed the beast egg hunt. Again limited documentation so it was more trail and error.
I messed around with mineos today on the freenas server. I got it configured and running for several different Minecraft servers. I had some challenges on 12.2 forge. Also I couldn’t get ssl working.
I’ve recently upgraded my FreeNAS server to version 11.3 and I setup my personal WordPress site in a FreeNAS Iocage Jail using PHP-FPM and Nginx web server. There are precious few write ups of this process so I decided to write one (and document my challenges). I hope you enjoy. Before you get started this is of moderate difficulty and there are much easier hosted solutions at WordPress.com. This is mostly an exercise of “is this possible” and the answer is yes!
There are numerous tutorials for doing this. I will be brief here. In the FreeNAS 11.3 web GUI interface, navigate to Jails and select Add. I named mine WordPress, you can choose whichever name suits your fancy; www is another good option. I selected default Jail type and release 11.3-Release (more about this later).
I selected DHCP auto configure for IPv4 which means FreeNAS will request an IP address from your router via DHCP (Dyn Host Config Protocol). Only select NAT if you want to put it on the same IP as your FreeNAS server but that takes some work since FreeNAS also sits on port 80, so save yourself the trouble and select DHCP. I unchecked autoconfigure of IPv6. In general I keep IPv6 off for security reasons. Hit next and then create.
Start your Jail using the FreeNAS web GUI. Note down the IP address of your jail for later. SSH (Secure Shell) into your Freenas (there are many tutorials on how to do that, I’ll leave to the reader) and type jls to view the Jails that have been configured and are running (note the JID or jail identifier). You can see in the screenshot below that my WordPress jail is running on jid 9. Execute the command “sudo exec 9 /bin/tcsh” to ssh into WordPress jail. BTW, there are like a half dozen ways to ssh into a jail, this is just the way I’m most comfortable with.
Step 2) Install packages
Now that you are ssh’ed into your FreeNAS 11.3 jail, we will install a number of software packages. This may or may not get out of date. I will attempt to keep it more or less current. Please note that we’ll install mysql 5.7 packages as the mysql 8.0 package fails when WordPress attempts to connect. Your mileage may vary and of course other RDBMS (Relational Database Management Systems) will also work. I’m a former Sybase DBA and I absolutely love Sybase for what it’s good at… I digress.. Ok, on to the packages…
First, run “pkg update” to fetch the latest package list for your Jail. Next, run “pkg upgrade” to upgrade any deployed package and the Jail software itself (Note, this may take a while if you run on an old Jail). There is another command needed to upgrade to another release (i.e. 11.2 to 11.3 release of FreeNAS) which I’ll leave to the reader.
Execute the following command to download the packages
It’ll pull in many other dependencies; it became 98 packages on my test machine, 669 MiB. Select “Y” to download and install. PHP packaging is *very* modular in general. If you forget a required package like let’s say php73-ctype and then continue, you’ll eventually get Jetpack connection errors that will have you pulling your hair out for a day until you realize (this happened to me!).
3) Create and Mount Your Datasets
Personally, I like to put software in the Jails and keep data on datasets outside of the Jails. This way I can create or upgrade software components away from the data for no-tears upgrades. I created 2 datasets on my FreeNAS pool named ssl and var. SSL like the description says is all things SSL certs and intermediate certs and CSR’s etc. I keep it separate from the Jails and separate from other datasets as I’ll want to use this with other services (Minecraft minos for instance). Var is for all things Variable that includes logs, WWW root and database backups.
Back at the command line to my WordPress Jail, I changed directory back to the /mnt directory and added two directories for the ssl dataset and the var dataset
Stop the WordPress Jail in the FreeNAS web GUI (in the Jails section). When it is stopped, select Mountpoints to add the mount points you just created.
Next, add the two mount points to the Jail you named WordPress. You will need to do this one at a time and select the source at the top to be the dataset you just created and the destination in the bottom pane which is the directory you created in your Jail. You can use different directory names; just remember what you used.
After you add the 2 mounts, you can go back to the Jails interface in FreeNAS and restart your WordPress jail.
4) Configure your Services to Autostart
Use that jls and jexec process (from end of Step 1) to ssh back into your WordPress Jail. You should notice that the JID number has incremented by 1 (this is expected). Check to make sure the /mnt/ssl and /mnt/var filesystems are mounted and writeable. You can touch a file in each directory and see if it’s written to the appropriate place.
Then type “grep rcvar /usr/local/etc/rc.d/*” to see what the enable configs are for all your services. In this example they are php_fpm_enable, nginx_enable and mysql_enable. Then vi the /etc/rc.conf file to add those configurations and enable them.
You of course can use whichever editor you like. I’m a vi person, emacs looks cool but vi works everywhere. Add those 3 entries at the bottom and save the file. Don’t start any services yet.
5) Configure php-fpm (Note: I have no idea what fpm means, I will speculate freebsd package mgmt)
Back in the ssh command line for your WordPress instance. Run the following command to copy the distributed php.ini (config) file to your instance.
root@wordpress:~ # vi /usr/local/etc/php-fpm.conf
;;;;;;;;;;;;;;;;;;;;;
; FPM Configuration ;
;;;;;;;;;;;;;;;;;;;;;

; All relative paths in this configuration file are relative to PHP's install
; prefix (/usr/local). This prefix can be dynamically changed by using the
; '-p' argument from the command line.

;;;;;;;;;;;;;;;;;;
; Global Options ;
;;;;;;;;;;;;;;;;;;

[global]
; Pid file
; Note: the default prefix is /var
; Default Value: none
pid = run/php-fpm.pid

; Error log file
; If it's set to "syslog", log is sent to syslogd instead of being written
; into a local file.
; Note: the default prefix is /var
; Default Value: log/php-fpm.log
;error_log = log/php-fpm.log

; syslog_facility is used to specify what type of program is logging the
; message. This lets syslogd specify that messages from different facilities
; will be handled differently.
; See syslog(3) for possible values (ex daemon equiv LOG_DAEMON)
; Default Value: daemon
;syslog.facility = daemon

; syslog_ident is prepended to every message. If you have multiple FPM
; instances running on the same server, you can change the default value
; which must suit common needs.
; Default Value: php-fpm
;syslog.ident = php-fpm

; Log level
; Possible Values: alert, error, warning, notice, debug
; Default Value: notice
;log_level = notice

; If this number of child processes exit with SIGSEGV or SIGBUS within the time
; interval set by emergency_restart_interval then FPM will restart. A value
; of '0' means 'Off'.
; Default Value: 0
;emergency_restart_threshold = 0

; Interval of time used by emergency_restart_interval to determine when
; a graceful restart will be initiated.  This can be useful to work around
; accidental corruptions in an accelerator's shared memory.
; Available Units: s(econds), m(inutes), h(ours), or d(ays)
; Default Unit: seconds
; Default Value: 0
;emergency_restart_interval = 0

; Time limit for child processes to wait for a reaction on signals from master.
; Available units: s(econds), m(inutes), h(ours), or d(ays)
; Default Unit: seconds
; Default Value: 0
;process_control_timeout = 0

; The maximum number of processes FPM will fork. This has been designed to control
; the global number of processes when using dynamic PM within a lot of pools.
; Use it with caution.
; Note: A value of 0 indicates no limit
; Default Value: 0
; process.max = 128

; Specify the nice(2) priority to apply to the master process (only if set)
; The value can vary from -19 (highest priority) to 20 (lowest priority)
; Note: - It will only work if the FPM master process is launched as root
;       - The pool process will inherit the master process priority
;         unless specified otherwise
; Default Value: no set
; process.priority = -19

; Send FPM to background. Set to 'no' to keep FPM in foreground for debugging.
; Default Value: yes
;daemonize = yes

; Set open file descriptor rlimit for the master process.
; Default Value: system defined value
;rlimit_files = 1024

; Set max core size rlimit for the master process.
; Possible Values: 'unlimited' or an integer greater or equal to 0
; Default Value: system defined value
;rlimit_core = 0

; Specify the event mechanism FPM will use. The following is available:
; - select     (any POSIX os)
; - poll       (any POSIX os)
; - epoll      (linux >= 2.5.44)
; - kqueue     (FreeBSD >= 4.1, OpenBSD >= 2.9, NetBSD >= 2.0)
; - /dev/poll  (Solaris >= 7)
; - port       (Solaris >= 10)
; Default Value: not set (auto detection)
events.mechanism = kqueue

; When FPM is built with systemd integration, specify the interval,
; in seconds, between health report notification to systemd.
; Set to 0 to disable.
; Available Units: s(econds), m(inutes), h(ours)
; Default Unit: seconds
; Default value: 10
;systemd_interval = 10

;;;;;;;;;;;;;;;;;;;;
; Pool Definitions ;
;;;;;;;;;;;;;;;;;;;;

; Multiple pools of child processes may be started with different listening
; ports and different management options.  The name of the pool will be
; used in logs and stats. There is no limitation on the number of pools which
; FPM can handle. Your system will tell you anyway :)

; Include one or more files. If glob(3) exists, it is used to include a bunch of
; files from a glob(3) pattern. This directive can be used everywhere in the
; file.
; Relative path can also be used. They will be prefixed by:
;  - the global prefix if it's been set (-p argument)
;  - /usr/local otherwise
include=/usr/local/etc/php-fpm.d/*.conf
Edit the file /usr/local/etc/php-fpm.d/www.conf
root@www:~ # vi /usr/local/etc/php-fpm.d/www.conf
; Start a new pool named 'www'.
; the variable $pool can be used in any directive and will be replaced by the
; pool name ('www' here)
[www]

; Per pool prefix
; It only applies on the following directives:
; - 'access.log'
; - 'slowlog'
; - 'listen' (unixsocket)
; - 'chroot'
; - 'chdir'
; - 'php_values'
; - 'php_admin_values'
; When not set, the global prefix (or /usr/local) applies instead.
; Note: This directive can also be relative to the global prefix.
; Default Value: none
;prefix = /path/to/pools/$pool

; Unix user/group of processes
; Note: The user is mandatory. If the group is not set, the default user's group
;       will be used.
user = www
group = www

; The address on which to accept FastCGI requests.
; Valid syntaxes are:
;   'ip.add.re.ss:port'    - to listen on a TCP socket to a specific IPv4 address on
;                            a specific port;
;   '[ip:6:addr:ess]:port' - to listen on a TCP socket to a specific IPv6 address on
;                            a specific port;
;   'port'                 - to listen on a TCP socket to all addresses
;                            (IPv6 and IPv4-mapped) on a specific port;
;   '/path/to/unix/socket' - to listen on a unix socket.
; Note: This value is mandatory.
listen = 127.0.0.1:9000

; Set listen(2) backlog.
; Default Value: 511 (-1 on FreeBSD and OpenBSD)
listen.backlog = -1

; Set permissions for unix socket, if one is used. In Linux, read/write
; permissions must be set in order to allow connections from a web server. Many
; BSD-derived systems allow connections regardless of permissions.
; Default Values: user and group are set as the running user
;                 mode is set to 0660
;listen.owner = www
;listen.group = www
;listen.mode = 0660
; When POSIX Access Control Lists are supported you can set them using
; these options, value is a comma separated list of user/group names.
; When set, listen.owner and listen.group are ignored
;listen.acl_users =
;listen.acl_groups =

; List of addresses (IPv4/IPv6) of FastCGI clients which are allowed to connect.
; Equivalent to the FCGI_WEB_SERVER_ADDRS environment variable in the original
; PHP FCGI (5.2.2+). Makes sense only with a tcp listening socket. Each address
; must be separated by a comma. If this value is left blank, connections will be
; accepted from any ip address.
; Default Value: any
listen.allowed_clients = 127.0.0.1

; Specify the nice(2) priority to apply to the pool processes (only if set)
; The value can vary from -19 (highest priority) to 20 (lower priority)
; Note: - It will only work if the FPM master process is launched as root
;       - The pool processes will inherit the master process priority
;         unless it specified otherwise
; Default Value: no set
; process.priority = -19

; Set the process dumpable flag (PR_SET_DUMPABLE prctl) even if the process user
; or group is differrent than the master process user. It allows to create process
; core dump and ptrace the process for the pool user.
; Default Value: no
; process.dumpable = yes

; Choose how the process manager will control the number of child processes.
; Possible Values:
;   static  - a fixed number (pm.max_children) of child processes;
;   dynamic - the number of child processes are set dynamically based on the
;             following directives. With this process management, there will be
;             always at least 1 children.
;             pm.max_children      - the maximum number of children that can
;                                    be alive at the same time.
;             pm.start_servers     - the number of children created on startup.
;             pm.min_spare_servers - the minimum number of children in 'idle'
;                                    state (waiting to process). If the number
;                                    of 'idle' processes is less than this
;                                    number then some children will be created.
;             pm.max_spare_servers - the maximum number of children in 'idle'
;                                    state (waiting to process). If the number
;                                    of 'idle' processes is greater than this
;                                    number then some children will be killed.
;  ondemand - no children are created at startup. Children will be forked when
;             new requests will connect. The following parameter are used:
;             pm.max_children           - the maximum number of children that
;                                         can be alive at the same time.
;             pm.process_idle_timeout   - The number of seconds after which
;                                         an idle process will be killed.
; Note: This value is mandatory.
pm = dynamic

; The number of child processes to be created when pm is set to 'static' and the
; maximum number of child processes when pm is set to 'dynamic' or 'ondemand'.
; This value sets the limit on the number of simultaneous requests that will be
; served. Equivalent to the ApacheMaxClients directive with mpm_prefork.
; Equivalent to the PHP_FCGI_CHILDREN environment variable in the original PHP
; CGI. The below defaults are based on a server without much resources. Don't
; forget to tweak pm.* to fit your needs.
; Note: Used when pm is set to 'static', 'dynamic' or 'ondemand'
; Note: This value is mandatory.
pm.max_children = 5

; The number of child processes created on startup.
; Note: Used only when pm is set to 'dynamic'
; Default Value: min_spare_servers + (max_spare_servers - min_spare_servers) / 2
pm.start_servers = 2

; The desired minimum number of idle server processes.
; Note: Used only when pm is set to 'dynamic'
; Note: Mandatory when pm is set to 'dynamic'
pm.min_spare_servers = 1

; The desired maximum number of idle server processes.
; Note: Used only when pm is set to 'dynamic'
; Note: Mandatory when pm is set to 'dynamic'
pm.max_spare_servers = 3

; The number of seconds after which an idle process will be killed.
; Note: Used only when pm is set to 'ondemand'
; Default Value: 10s
;pm.process_idle_timeout = 10s;

; The number of requests each child process should execute before respawning.
; This can be useful to work around memory leaks in 3rd party libraries. For
; endless request processing specify '0'. Equivalent to PHP_FCGI_MAX_REQUESTS.
; Default Value: 0
;pm.max_requests = 500

; The URI to view the FPM status page. If this value is not set, no URI will be
; recognized as a status page. It shows the following informations:
;   pool                 - the name of the pool;
;   process manager      - static, dynamic or ondemand;
;   start time           - the date and time FPM has started;
;   start since          - number of seconds since FPM has started;
;   accepted conn        - the number of request accepted by the pool;
;   listen queue         - the number of request in the queue of pending
;                          connections (see backlog in listen(2));
;   max listen queue     - the maximum number of requests in the queue
;                          of pending connections since FPM has started;
;   listen queue len     - the size of the socket queue of pending connections;
;   idle processes       - the number of idle processes;
;   active processes     - the number of active processes;
;   total processes      - the number of idle + active processes;
;   max active processes - the maximum number of active processes since FPM
;                          has started;
;   max children reached - number of times, the process limit has been reached,
;                          when pm tries to start more children (works only for
;                          pm 'dynamic' and 'ondemand');
; Value are updated in real time.
; Example output:
;   pool:                 www
;   process manager:      static
;   start time:           01/Jul/2011:17:53:49 +0200
;   start since:          62636
;   accepted conn:        190460
;   listen queue:         0
;   max listen queue:     1
;   listen queue len:     42
;   idle processes:       4
;   active processes:     11
;   total processes:      15
;   max active processes: 12
;   max children reached: 0
;
; By default the status page output is formatted as text/plain. Passing either
; 'html', 'xml' or 'json' in the query string will return the corresponding
; output syntax. Example:
;   http://www.foo.bar/status
;   http://www.foo.bar/status?json
;   http://www.foo.bar/status?html
;   http://www.foo.bar/status?xml
;
; By default the status page only outputs short status. Passing 'full' in the
; query string will also return status for each pool process.
; Example:
;   http://www.foo.bar/status?full
;   http://www.foo.bar/status?json&full
;   http://www.foo.bar/status?html&full
;   http://www.foo.bar/status?xml&full
; The Full status returns for each process:
;   pid                  - the PID of the process;
;   state                - the state of the process (Idle, Running, ...);
;   start time           - the date and time the process has started;
;   start since          - the number of seconds since the process has started;
;   requests             - the number of requests the process has served;
;   request duration     - the duration in µs of the requests;
;   request method       - the request method (GET, POST, ...);
;   request URI          - the request URI with the query string;
;   content length       - the content length of the request (only with POST);
;   user                 - the user (PHP_AUTH_USER) (or '-' if not set);
;   script               - the main script called (or '-' if not set);
;   last request cpu     - the %cpu the last request consumed
;                          it's always 0 if the process is not in Idle state
;                          because CPU calculation is done when the request
;                          processing has terminated;
;   last request memory  - the max amount of memory the last request consumed
;                          it's always 0 if the process is not in Idle state
;                          because memory calculation is done when the request
;                          processing has terminated;
; If the process is in Idle state, then informations are related to the
; last request the process has served. Otherwise informations are related to
; the current request being served.
; Example output:
;   ************************
;   pid:                  31330
;   state:                Running
;   start time:           01/Jul/2011:17:53:49 +0200
;   start since:          63087
;   requests:             12808
;   request duration:     1250261
;   request method:       GET
;   request URI:          /test_mem.php?N=10000
;   content length:       0
;   user:                 -
;   script:               /home/fat/web/docs/php/test_mem.php
;   last request cpu:     0.00
;   last request memory:  0
;
; Note: There is a real-time FPM status monitoring sample web page available
;       It's available in: /usr/local/share/php/fpm/status.html
;
; Note: The value must start with a leading slash (/). The value can be
;       anything, but it may not be a good idea to use the .php extension or it
;       may conflict with a real PHP file.
; Default Value: not set
;pm.status_path = /status

; The ping URI to call the monitoring page of FPM. If this value is not set, no
; URI will be recognized as a ping page. This could be used to test from outside
; that FPM is alive and responding, or to
; - create a graph of FPM availability (rrd or such);
; - remove a server from a group if it is not responding (load balancing);
; - trigger alerts for the operating team (24/7).
; Note: The value must start with a leading slash (/). The value can be
;       anything, but it may not be a good idea to use the .php extension or it
;       may conflict with a real PHP file.
; Default Value: not set
;ping.path = /ping

; This directive may be used to customize the response of a ping request. The
; response is formatted as text/plain with a 200 response code.
; Default Value: pong
;ping.response = pong

; The access log file
; Default: not set
;access.log = log/$pool.access.log

; The access log format.
; The following syntax is allowed
;  %%: the '%' character
;  %C: %CPU used by the request
;      it can accept the following format:
;      - %{user}C for user CPU only
;      - %{system}C for system CPU only
;      - %{total}C  for user + system CPU (default)
;  %d: time taken to serve the request
;      it can accept the following format:
;      - %{seconds}d (default)
;      - %{miliseconds}d
;      - %{mili}d
;      - %{microseconds}d
;      - %{micro}d
;  %e: an environment variable (same as $_ENV or $_SERVER)
;      it must be associated with embraces to specify the name of the env
;      variable. Some exemples:
;      - server specifics like: %{REQUEST_METHOD}e or %{SERVER_PROTOCOL}e
;      - HTTP headers like: %{HTTP_HOST}e or %{HTTP_USER_AGENT}e
;  %f: script filename
;  %l: content-length of the request (for POST request only)
;  %m: request method
;  %M: peak of memory allocated by PHP
;      it can accept the following format:
;      - %{bytes}M (default)
;      - %{kilobytes}M
;      - %{kilo}M
;      - %{megabytes}M
;      - %{mega}M
;  %n: pool name
;  %o: output header
;      it must be associated with embraces to specify the name of the header:
;      - %{Content-Type}o
;      - %{X-Powered-By}o
;      - %{Transfert-Encoding}o
;      - ....
;  %p: PID of the child that serviced the request
;  %P: PID of the parent of the child that serviced the request
;  %q: the query string
;  %Q: the '?' character if query string exists
;  %r: the request URI (without the query string, see %q and %Q)
;  %R: remote IP address
;  %s: status (response code)
;  %t: server time the request was received
;      it can accept a strftime(3) format:
;      %d/%b/%Y:%H:%M:%S %z (default)
;      The strftime(3) format must be encapsuled in a %{<strftime_format>}t tag
;      e.g. for a ISO8601 formatted timestring, use: %{%Y-%m-%dT%H:%M:%S%z}t
;  %T: time the log has been written (the request has finished)
;      it can accept a strftime(3) format:
;      %d/%b/%Y:%H:%M:%S %z (default)
;      The strftime(3) format must be encapsuled in a %{<strftime_format>}t tag
;      e.g. for a ISO8601 formatted timestring, use: %{%Y-%m-%dT%H:%M:%S%z}t
;  %u: remote user
;
; Default: "%R - %u %t \"%m %r\" %s"
;access.format = "%R - %u %t \"%m %r%Q%q\" %s %f %{mili}d %{kilo}M %C%%"

; The log file for slow requests
; Default Value: not set
; Note: slowlog is mandatory if request_slowlog_timeout is set
;slowlog = log/$pool.log.slow

; The timeout for serving a single request after which a PHP backtrace will be
; dumped to the 'slowlog' file. A value of '0s' means 'off'.
; Available units: s(econds)(default), m(inutes), h(ours), or d(ays)
; Default Value: 0
;request_slowlog_timeout = 0

; Depth of slow log stack trace.
; Default Value: 20
;request_slowlog_trace_depth = 20

; The timeout for serving a single request after which the worker process will
; be killed. This option should be used when the 'max_execution_time' ini option
; does not stop script execution for some reason. A value of '0' means 'off'.
; Available units: s(econds)(default), m(inutes), h(ours), or d(ays)
; Default Value: 0
;request_terminate_timeout = 0

; Set open file descriptor rlimit.
; Default Value: system defined value
;rlimit_files = 1024

; Set max core size rlimit.
; Possible Values: 'unlimited' or an integer greater or equal to 0
; Default Value: system defined value
;rlimit_core = 0

; Chroot to this directory at the start. This value must be defined as an
; absolute path. When this value is not set, chroot is not used.
; Note: you can prefix with '$prefix' to chroot to the pool prefix or one
; of its subdirectories. If the pool prefix is not set, the global prefix
; will be used instead.
; Note: chrooting is a great security feature and should be used whenever
;       possible. However, all PHP paths will be relative to the chroot
;       (error_log, sessions.save_path, ...).
; Default Value: not set
;chroot =

; Chdir to this directory at the start.
; Note: relative path can be used.
; Default Value: current directory or / when chroot
;chdir = /var/www

; Redirect worker stdout and stderr into main error log. If not set, stdout and
; stderr will be redirected to /dev/null according to FastCGI specs.
; Note: on highloaded environement, this can cause some delay in the page
; process time (several ms).
; Default Value: no
;catch_workers_output = yes

; Clear environment in FPM workers
; Prevents arbitrary environment variables from reaching FPM worker processes
; by clearing the environment in workers before env vars specified in this
; pool configuration are added.
; Setting to "no" will make all environment variables available to PHP code
; via getenv(), $_ENV and $_SERVER.
; Default Value: yes
;clear_env = no

; Limits the extensions of the main script FPM will allow to parse. This can
; prevent configuration mistakes on the web server side. You should only limit
; FPM to .php extensions to prevent malicious users to use other extensions to
; execute php code.
; Note: set an empty value to allow all extensions.
; Default Value: .php
;security.limit_extensions = .php .php3 .php4 .php5 .php7

; Pass environment variables like LD_LIBRARY_PATH. All $VARIABLEs are taken from
; the current environment.
; Default Value: clean env
;env[HOSTNAME] = $HOSTNAME
;env[PATH] = /usr/local/bin:/usr/bin:/bin
;env[TMP] = /tmp
;env[TMPDIR] = /tmp
;env[TEMP] = /tmp
env[HOSTNAME] = $HOSTNAME
env[PATH] = /usr/local/bin:/usr/bin:/bin
env[TMP] = /tmp
env[TMPDIR] = /tmp
env[TEMP] = /tmp

; Additional php.ini defines, specific to this pool of workers. These settings
; overwrite the values previously defined in the php.ini. The directives are the
; same as the PHP SAPI:
;   php_value/php_flag             - you can set classic ini defines which can
;                                    be overwritten from PHP call 'ini_set'.
;   php_admin_value/php_admin_flag - these directives won't be overwritten by
;                                     PHP call 'ini_set'
; For php_*flag, valid values are on, off, 1, 0, true, false, yes or no.

; Defining 'extension' will load the corresponding shared extension from
; extension_dir. Defining 'disable_functions' or 'disable_classes' will not
; overwrite previously defined php.ini values, but will append the new value
; instead.

; Note: path INI options can be relative and will be expanded with the prefix
; (pool, global or /usr/local)

; Default Value: nothing is defined by default except the values in php.ini and
;                specified at startup with the -d argument
;php_admin_value[sendmail_path] = /usr/sbin/sendmail -t -i -f www@my.domain.com
;php_flag[display_errors] = off
;php_admin_value[error_log] = /var/log/fpm-php.www.log
;php_admin_flag[log_errors] = on
;php_admin_value[memory_limit] = 32M

php_admin_value[memory_limit] = 512M
php_admin_value[cgi.fix_pathinfo] = 0
php_admin_value[post_max_size] = 13M
php_admin_value[upload_max_filesize] = 13M
php_admin_value[date.timezone] = "America/Chicago"
6) Configure Nginx Web Server
We are getting close; please hang in there! For this section we will create a series of config files for Nginx web server. We will default it to use SSL encryption (you will need to supply your own SSL certs). I can give you the steps to create a self signed SSL cert to test, but you’ll want to get a proper SSL cert (which costs $$$) from your domain registrar or another location.
Create and edit the following configuration files:
/usr/local/etc/nginx/php_handlers.conf: This config file directs where all the php scripts will be handled.
/usr/local/etc/nginx/conf.d/redirect.conf: This config file that redirects all the HTTP requests to HTTPS.
/usr/local/etc/nginx/ssl.conf: This config file has all the settings defined to enable SSL on the web sever.
/usr/local/etc/nginx/conf.d/www.conf: This is the default wordpress server config file
/usr/local/etc/nginx/nginx.conf: This is the main config file for the nginx webserver.
Create the server hosts configuration directory /usr/local/etc/nginx/conf.d
Create the /usr/local/etc/nginx/php_handlers.conf configuration file.
root@wordpress:~ # vi /usr/local/etc/nginx/php_handlers.conf
# PHP Handlers

# WordPress
upstream php_wp {
        # This should match value of the "listen" directive in php-fpm pool for www
        # localhost and port 9000
        server 127.0.0.1:9000;
}
Create and edit the /usr/local/etc/nginx/conf.d/redirect.conf file
root@wordpress:~ # vi /usr/local/etc/nginx/conf.d/redirect.conf
server {
    listen 80 default_server;

    # Redirect all HTTP requests to HTTPS with a 301 Moved Permanently response.
    return 301 https://$host$request_uri;
}
Create and edit the /usr/local/etc/nginx/conf.d/www.conf
root@wordpress:~ # vi /usr/local/etc/nginx/conf.d/www.conf
# www - public server
server {
   listen       443 ssl http2;
   server_name  www.example.com example.com;

   root    /mnt/var/www/wordpress;
   index  index.php;

   # php max upload limit cannot be larger than this size
   client_max_body_size 13m;

   # SSL Configuration
   include /usr/local/etc/nginx/ssl.conf;

   location / {
       try_files $uri $uri/ /index.php?$args;
   }

   location ~ \.php$ {
        include        fastcgi_params;
        fastcgi_index  index.php;
        fastcgi_param  SCRIPT_FILENAME $request_filename;
        fastcgi_pass   php_wp;  # php handler for www
        fastcgi_buffers 16 16k;
        fastcgi_buffer_size 32k;
   }

   location ~* \.(js|css|png|jpg|jpeg|gif|ico)$ {
        expires max;
        access_log off;
        log_not_found off;
   }

} # End of www server block
Edit the file /usr/local/etc/nginx/nginx.conf
root@wordpress:~ # ee /usr/local/etc/nginx/nginx.conf
# Load Modules
load_module /usr/local/libexec/nginx/ngx_mail_module.so;
load_module /usr/local/libexec/nginx/ngx_stream_module.so;

user www;
worker_processes auto;

error_log  /var/run/error.log;
#
# service start script is looking here for the pid. don't move it.
pid        /var/run/nginx.pid;

events {
  worker_connections 1024;
}

http {

  # Basic settings
  # ----------

  sendfile on;
  tcp_nopush on;
  keepalive_timeout 65;
  #server_tokens off;

  # Common limits
  # ----------

  include mime.types;
  default_type application/octet-stream;

  # Logs format
  # ----------

  log_format main '$remote_addr - $host [$time_local] "$request" '
                  '$status $body_bytes_sent "$http_referer" '
                  '"$http_user_agent" "$http_x_forwarded_for"'
                  'rt=$request_time ut=$upstream_response_time '
                  'cs=$upstream_cache_status';

  log_format cache '$remote_addr - $host [$time_local] "$request" $status '
                   '$body_bytes_sent "$http_referer" '
                   'rt=$request_time ut=$upstream_response_time '
                   'cs=$upstream_cache_status';

  access_log /var/log/nginx/access.log main;
  error_log /var/log/nginx/error.log warn;

  # GZip config
  # ----------

  gzip on;

  # Cache config
  # ----------

  # PHP Handlers
  # ----------
  include /usr/local/etc/nginx/php_handlers.conf;


  # Virtual host config
  # ----------
  # Only virtual host with the *.conf will be included.
  include /usr/local/etc/nginx/conf.d/*.conf;

}  # End of http block
7) Configure SSL for Nginx
Create a self-signed SSL certificate using openssl.
This will only be useful for your testing purposes. All guests to your web server will be prompted with a fun little message that this site cannot be trusted. It’s fine for this tutorial though, you will need to procure your own SSL certificate from your domain registrar or another reputable source. Note that I saved that keyfile and the cert into our mount point for the SSL dataset we created in a previous step.
Create and edit the /usr/local/etc/nginx/ssl.conf file
# Certs sent to the client in SERVER HELLO are concatenated in ssl_certificate

ssl_certificate           /mnt/ssl/certs/selfsigned.crt; # self signed cert
ssl_certificate_key       /mnt/ssl/private/selfsigned.key; # self signed Key

#ssl_verify_client on;

# more secure ssl settings
ssl_protocols             TLSv1.3 TLSv1.2;
ssl_prefer_server_ciphers  on;
ssl_ciphers "EECDH+ECDSA+AESGCM EECDH+aRSA+AESGCM EECDH+ECDSA+SHA384 EECDH+ECDSA+SHA256 EECDH+aRSA+SHA384 EECDH+aRS
A+SHA256 EECDH+aRSA+RC4 EECDH EDH+aRSA !RC4 !aNULL !eNULL !LOW !3DES !MD5 !EXP !PSK !SRP !DSS";


## verify chain of trust (if needed)
#ssl_trusted_certificate    /mnt/ssl/certs/cacert.pem;
8) Configure mysql database
WordPress leverages a database for much of the dynamic content (posts, users, pages, comments, etc). You’ll need to do a very small amount of configuration prior to first usage of WordPress. First and foremost you’ll need to start up the mysql server.
service mysql-server start
If you receive no errors then your mysql server should be running. you can check by running “netstat -an | grep 3306” and you should see a row starting with tcp4 and ending with LISTEN. If nothing is returned from the above command your mysql server is not running and you’ll need to troubleshoot that.
Next, you will need to run a script to secure the mysql installation. The first step is to login to mysql as root. The root password is either blank (i.e. nothing) or a special file called .mysql_secret in the root home directory that contains the password
mysql_secure_installation
Set the new root password, disable anonymous logins and root logins from external and remove the temp database. You can set password requirements, but if you do then it’ll only allow high strength passwords in WordPress. When the script is done login as root and create the WordPress database.
mysql –u root –p
create database wordpress;
grant all privileges on wordpress.* to 'wpuser'@'localhost' identified by 'wppassword';
flush privileges;
exit
If you made it this far you really deserve a break; maybe a nice cup of camomile tea? Literally this took me like 2 nights to get this far…
9) Download WordPress Installation
WordPress is essentially a bunch of php files, some css and some other files. You can download the latest tarball (i.e a tar.gz archive) from http://www.wordpress.org (don’t mistakenly go to the .com version!). Hit the “Get WordPress” bottom and click the download .tar.gz link. You should scp the tar.gz file from your pc to the FreeNAS server. You should save it in your /var dataset which you mounted in a previous step. Mine is located in /mnt/PavPool/var, so the command from my pc would be:
Create a directory called www and extract the WordPress archive there. Make sure the directory structure matches the path you set in www.conf in Step 6. If your jail is expecting /mnt/var/wordpress then the workpress software must be extracted into a folder called wordpress. Make sure the files are directory structure are readable and writeable by your nginx server process.
10) Now Restart everything and Try to Connect
You need to reload and restart all your components to load the configurations files. You will get an error if the configuration files are
root@wordpress:/ # service php-fpm reload

Performing sanity check on php-fpm configuration:
[19-Apr-2020 15:06:35] NOTICE: configuration file /usr/local/etc/php-fpm.conf test is successful
Make sure your php-fpm.conf file passes the validation check. Now restart PHP
root@wordpress:/ # service php-fpm restart

Performing sanity check on php-fpm configuration:
[19-Apr-2020 15:10:18] NOTICE: configuration file /usr/local/etc/php-fpm.conf test is successful

Stopping php_fpm.
Waiting for PIDS: 57658.
Performing sanity check on php-fpm configuration:
[19-Apr-2020 15:10:18] NOTICE: configuration file /usr/local/etc/php-fpm.conf test is successful
Now reload nginx webe server and restart it. Again, make sure the reload validation step passes (it doesn’t mean that it will functionally work but at least you don’t have typos in your config files.).
root@wordpress:/ # service nginx reload

Performing sanity check on nginx configuration:
nginx: the configuration file /usr/local/etc/nginx/nginx.conf syntax is ok
nginx: configuration file /usr/local/etc/nginx/nginx.conf test is successful

root@wordpress:/ # service nginx restart

Performing sanity check on nginx configuration:
nginx: the configuration file /usr/local/etc/nginx/nginx.conf syntax is ok
nginx: configuration file /usr/local/etc/nginx/nginx.conf test is successful
Stopping nginx.
Waiting for PIDS: 7244.
Performing sanity check on nginx configuration:
nginx: the configuration file /usr/local/etc/nginx/nginx.conf syntax is ok
nginx: configuration file /usr/local/etc/nginx/nginx.conf test is successful
Starting nginx.
Remember the IP address for your wordpress jail that you wrote down from step 1? Well, type that IP address into a web browser. If you are greeted by a webpage by WordPress to initialize your site for the first time then Success.
Run a quick netstat check to see if you are listening on the ports you configured in the previous steps: 80 is http traffic (unencrypted) which will foward to 443 which is SSL encrypted by nginx, 9000 is php-fpm, and 3306 is mysql.
11) Configure port forwarding on your wifi router
You are in the home stretch now. Connect to wifi router and login as an admin account. Typically in the WAN section there is a series of options for port fowarding. If any external requests come into your External IP address for port 80 or port 443 you shoudl configure that to redirect or port forward those to the IP address for your wordpress Jail. Make sure your wifi router is configured with your dynamic DNS provider of choice; for example DynDNS. Ultimately traffic to yourdomain.com will be redirected by your dynamic DNS service provider to your externally visiable IP address that is issued to your wifi router (usually thru DHCP) which will then port forward anything on port 80 or 443 to your jail internal NAT-ed (Network Address Translation) IP for WordPress which is where nginx is running. When you initialize your site USE YOUR external domain name in the wordpress config and not the internal IP address. If you mess this up and use your internal IP address then WordPress will look fine for you inside your network where your FreeNAS box is but the formatting will be missing or corrupted for everyone else outside your network that views your site. You can very easily drop your Mysql WordPress database if you chose any of the wrong options and re-create it to reinitilize your site. I hope this was useful to you; it’s a long read but utltimately I’m very happy with the setup!