
My kids love to play Minecraft; it’s a fun game that has remained extremely popular for a decade (a rare feat). Everyone in the family has an account and much of the fun of Minecraft is playing together in a shared world. I will teach you how to setup shared worlds (and back them up) using MineOS software on FreeNAS / TrueNAS.
Step 1: Install MineOS FreeNAS Plugin
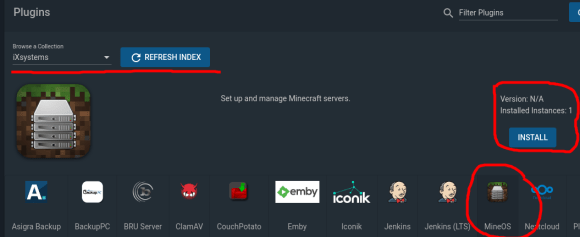
The folks at IXSystems must be big fans of Minecraft because they packaged a Minecraft server solution along with backup utilities and Plex. MineOS is a free plugin to allow you to host Minecraft servers on your FreeNAS box. Within Plugins menu item on FreeNAS web GUI select MineOS and select INSTALL. Give it a name, I chose mineos and select plugin details >>> mostly select DHCP vs. NAT for networking. DHCP will create a fresh Jail, use DHCP to configure networking and install the MineOS software.

If your plugin installation is successful it will look similar to the above image. Note the IPv4 address and click the Manage link to be redirected to the MineOS login page. The default username is mcserver and the default password is mcserver.

When you login, you should see a web GUI similar to the above. In this example I have two (2) servers running. Your example will show no servers running (which is totally ok!). The Dashboard link (circled above) will return you to this menu for any point in MineOS.
Why MineOS?
MineOS is an open source project from William Dizon (looks like it’s been around since 2010). Essentially a Web GUI for administering your Minecraft servers along with utilities to backup and upgrade your world. It’s useful to move an server or daemon process off you local host or laptop to provide improved resiliency and uptime and allow for dedicated resources. You can also setup port forwarding on your wifi router along with a dynamic dns name to allow folks from outside your local area network (LAN) to connect to your Minecraft server. MineOS also allows you to upgrade your world from various versions of Minecraft releases and try out new exciting systems like direwolf and feed the beast (more on this later).
Step 2: Download Server Profile Jars
Minecraft Java Edition is packaged and released as Java Archive (JAR) files from Mojang.com. Your Minecraft launcher application on Windows, Mac or Linux will automation this download when you select the game version. In MineOS you will need to click on the Profiles menu item (on the left), select Mojang from the ID column and then click the Green Download button. You know that you are successful if you see the check and Downloaded next to the Jars you requested. Be careful and do not try and get every Jar at once; the Web GUI doesn’t have a throttle.

If you have errors Downloading Server Jars, do the following:
- Stop and Start the Mineos Jail in FreeNAS. Sometimes, I’ve seen it where the networking (to the outside world) doesn’t work correctly the first time. I don’t think this is a problem anymore but worth trying.
- Make sure you know where Mineos is trying to save those Jars and that you have write access and enough space. We’ll get into customizing where these Jars are saved in a later article.

Step 3: Create Your First Server
Back on the MineOS menu, please select the “Create New Server” menu item. You will be presented with a dialog to name the server; I chose the name of server01 (boring, I know). All fields with light-gray text will default to those values, i.e. the port will be set to 25565 (which is the default for Minecraft). You might want to change the Level-Name to something interesting. Set the difficulty and gamemode and click create new server. Please note it doesn’t actually start the server yet (we’ll do that next) and most if not all these items can be changed with the exception of the server name.
Step 4: Start Your First Minecraft Server
In the MineOS web GUI go back to the Dashboard and select the server you created.

The Server At A Glance dashboard is very informational. If the server is down, as it will be initially, the server status will be RED. In the Server Actions box, you need to choose the Minecraft server profile you downloaded from Step 2 (in this case 1.16.3). You should ensure that broadcast to LAN and start server on boot checkboxes are checked. In the Java settings you need to select the JAR file from Step 2 (in this case minecraft_server.1.16.3.jar. I like to set the max Java heap (memory) size on the Java runtime to between 1024 and 2048 Mb (1 to 2 Gb). -Xms means minimum Heap size; it’s ok to leave that blank.
Then click Accept EULA and click start to run the server.
If all goes well your Server should show up on the status page and if you click on the latest log link on the left you should see something similar to the below

In your Minecraft Java client you should select Multiplayer and add the server IP that your MineOS is running on to connect to the server (in this case 192.168.1.12). Once you connect, the latest log will show a connection log message for each player. Enjoy!

