<from NASA>Skywatchers are in for an end-of-year treat. What has become known popularly as the “Christmas Star” is an especially vibrant planetary conjunction easily visible in the evening sky over the next two weeks as the bright planets Jupiter and Saturn come together, culminating on the night of Dec. 21.</NASA>
This photo was taken with my Canon 50D using a 300mm lens. I’m not super knowledgeable on all things Camera. The full RAW image is huge, this is a small export of it taken from my front porch in Cypress, Texas.
I setup a photo studio in my office. I have a green screen, Cameron’s recording lights and the Cannon 50d on a tripod tethered to my computer. It’s a complex setup. I’m using FOSS called entangle (to capture) and the Gimp with Darkroom plug-in to open the Canon RAW image files. I’m learning about f-stop and ISO speed. It’s all complex and I’m out of my depth a bit but it’s fun. It’s been a while since I’ve messed around with Adobe Photoshop. I’m trying to relearn a skill on Gimp and it’s a bit different. I’ll get the hang of it sooner or later.
With better lighting future music star?I was still, she moved fast what a ham.
In an average 5 min time-span my network firewall is scanned about 25-50 times (+/-). It is scanned from all over the world including Morocco, Hong Kong, Los Angeles, Moscow, Beijing and London (to name a few). I’m sure sophisticated and not-so-sophisticated hackers are using VPN’s or TOR to show they are in another location or to hide their tracks. What are they trying to accomplish? Well, basically, they are checking if any doors are unlocked to try and get access or information. In computer network security this means network services are running either unlocked, unprotected or protected with weak or known passwords. Most folks would be unaware in such a circumstance to poor network security until they get hacked. Some folks purposely leave hosts exposed with services to capture details on hacker methods (those are called honeypots). I noticed that I have a lot of port scanning of 1433 (MS Sql Server), 21 (FTP), 22 (SSH) and 23 (Telnet) among many others. If those ports are listened to by a service on my home network that is exposed to the general internet then these scans will pick that up and essentially report back that I have a running service. Additionally, they could be trying known generic passwords or any security vulnerabilities.
This report was generated with live syslog data from my wifi router which is being ingested by Graylog and processing done on the router log messages to lookup any known threats. These threat and Geo Location lookups are built-in features of Graylog.
I found a useful blog that identified items to check when setting this up.
Check your processing order, your order is wrong, if you use pipeline rules. Please move your Message Filter chain before Pipeline Processor.
Check if your geoip lookup table works. Put a internet ip address to section Test Lookup in field Key, and it should return GEO information.
If not, check your data adaptor if you use correct Database type for your downloaded file. I use GeoLite2-City.mmdb and Database type: City Database. If you use only Country database, change correct type.
Best is to put MaxDB databases to /etc/graylog/server directory, check if graylog service can read file.
You need extracted field with ip addresss, for example src_ip with only ip adresses to use in lookup table. I couldn’t see any ip field in your fields screenshot. So create extractor or pipeline rule for ip field extraction first.
You can use geo ip lookup table in several parts: Extractor, Converter, Decorator or Pipeline Rule.
There is no special geoip map icon in field.
If you want to create World Map widget, create widget from field src_ip_geo_location (or Show top values) and change Visualization type to World Map.
If you use Selinux (CentOS, RHEL) try to disable to check, if it’s not blocking access to geoip db file.
While I resisted the pull of the ‘smart speaker’ for a little while, I have to admit having Amazon Music and an Echo has been one of the most enjoyable things I’ve bought for myself over the past couple of years. Maybe it’s my age, but voice activation still seems very cool to me, but I’m middle aged, quite often tired and like most adults, I have a lot of dull stuff to do in my life. ‘Aha…… Katie, why not automate away that toil……’
So yes, that’s why I thought it would be fun (and help me reawaken some tech skills) to build my own app. Of course, their is info out there already on this, but I found a lot of it stopped a bit short, or jumped right into the code writing. So here’s my write up of the first part of it which is the basic interaction between you and Alexa. After that I’ll do write ups of how to use lambda a bit more to actually have functionality.
You will need:
A developer account for the Alexa Skills Kit (ASK)/ Alexa Developer Console. developer.amazon.com
An AWS account: aws.amazon.com . You can get an account with a free tier to use AWS lambda assuming you don’t exceed 1 million requests a month. (You’ll need to provide a payment method to get the account)
Some basic python coding skills
A brilliant idea!
Alexa Developer Console
This is where you create the voice interaction model. It’s a web based IDE- nothing to download, and it has it’s own test environment. I used the following tutorial, but I found it simpler to write up my own notes.
Here’s my translation of the Alexa terms:
A name for your skill ie. ” Alexa, open <insert cool name here>”- that’s the invocation name. I recommend making it simple as you may forget it….. I did, more than once.
Intents could be translated as ‘functions’ of the app. With utterances being the phrases you may say, to initiate those ‘functions’.
Within the utterances, you can set variables- which translates as ‘slots’. You can set the available value of the slot.
Set your endpoint- ie. link it to the code in AWS Lamda
Example:
Invocation: Bin check
Intents: Check_next
Utterance: When is the next {bin_type} collection
Intent Slots: bin_type
Slot Type: waste_type with user utterances: garden waste; rubbish etc.
Once you have it all set up you’ll need to ‘build model’.
But really, that won’t do anything on it’s own. That’s where lambda comes in.
To get ready for the next bit I recommend going to the Endpoint menu to show your ‘Skill ID’ which you’ll need for later:
AWS Lambda:
For this I assume you’ve set up an AWS account and are on the Lambda service.
Firstly, You’re going to need to create a new function.
Choose a name (I went for ‘Bins’), and choose the language in which you’ll write the function. I went for Python and left the default IAM selection.
Now press ‘Create function’.
Once created you’ll see the IDE with the following at the top. This is how you link it to the ASK work you did earlier. At the following :
Click “Add trigger”. You want to choose “Alexa Skills Kit”
The following should appear and you can add the Skill ID I highlighted earlier. Click Add.
You now want to do the reverse. At the top right of the functions screen you should see the following. Copy this ready to link it back.
Right. Now back to the ASK console. Back to the Endpoints section and copy and past your function ID in. Notice you have regional options if perhaps in your Alexa skill, a reference to pants might warrant a different response if your end user is in the UK or the US………
Save the end points and …. ta da……. you’ve linked your alexa skill to a function! Sure it doesn’t do anything yet….. but hey. That’s part 2…..
From March 2020 to the present I have worked from home; I am fortunate that my company allows me such freedom. I am interested in returning to the office next year but I enjoy knowing that I can work from home fairly efficiently and that my company invested in their infrastructure to facilitate a mass migration from the office to almost entire WFH overnight. My home Internet access, powered by Comcast Xfinity, and my personal computer needed upgrades though to reach the level of performance I required to do my job (more on my desktop computer in a future post). Prior to Covid-19, my home network was not slouch, but I honestly didn’t use it except nights and weekends. Middling performance was sort-of ok — I mean it wasn’t but I’m not going to call Comcast to complain if my Internet drops occasionally. Raw network speed is important but stability is the most important factor. If I’m on a call with my supervisor (or a team meeting), I don’t want the Zoom call to hang or drop. This adds a level of stress on me as my home Internet connection is now a requirement for not only me working from home but also my daughter completing her school-work.
Let me first define what a poor Internet connection looks and feels like. As I mentioned, I have a Comcast Xfinity Cable Internet connection; specifically I have the Performance Plus package which is 600 Mb down and 20 Mb up (notice the little b in that statement). Megabits stands for a million bits (a one or a zero) and it’s a common trick that network service providers play. A byte is 8 bits, bytes are what file sizes are measured in. The large Megabit number feels impressive but btyes are a better measure of file transfer speed and usage. Honestly though, it doesn’t matter as long as you know what you need and most importantly you don’t overpay for bandwidth you don’t know or vice versa. Comcast offers a Gigabit internet connection for a bit more money each month; I’m not going to bite at that until I can prove that my issues/limitations are caused by the bandwidth cap and not some other weak link in the chain (you are only as fast as the slowest link in the proverbial network chain).
Remember that scene in “The Matrix” where Neo swallows the blue pill? You may ask, which Matrix movie which I would respond “There is only one Matrix movie”, but I digress…. You know that sound that is made when Neo swallows the pill, it is a very distinct sound of stuttering audio. That is the sound that Zoom (or other video conferencing apps) make audio or video lags. This sound kills a meeting and impacts your ability to WFH. A more nefarious version of this issue is when the Audio/Video of a Zoom call is coming in fine for you since the download speed is typically much higher bandwidth but your meeting recipients see a stuttering mess when it comes to your audio/video feed. That stuttering audio sound should be familiar to many as it’s the result of poor Internet connection. There can be many reasons for this sound and we’ll go through them one by one to triage the problem.
Step 1: Call Comcast and Complain
If you are a technical person and you know a bit about computers and networking, this is going to be the hardest step. Calling the 800 number can be a frustrating experience for technical-minded individuals. Please remember to be courteous and kind to those who answer the phone. They must run thru their approved script of troubleshooting activities and mostly they speak to non-technically minded individuals — so cut them some slack! Your conversation will always start with, “Let’s reboot your cable modem to see if that fixes the issue”. I’m sure in many cases that would do the trick, but we (my cultured friends) are technically minded and we’ve already done that step. They will send a signal to your cable modem to assess connectivity and reboot as needed. I have not seen this script but it seems a required step before they move on to other steps. Every call or conversation starts with, “can we reboot your cable modem Mr./Mrs <insert your name>?” or the familiar question of “Is your computer directly connected to the cable modem?”. If you own your own WiFi router, Comcast doesn’t want to spend tech time debugging issues with your hardware. They will suggest you connect directly to the cable modem to cut out the middle-man. You should humor them as ultimately you want to show the problem of poor internet performance is repeatable when you are directly connected to the cable modem and therefore the root cause of the problem isn’t your WiFi router. As you progress through the scripted questions, where you want to end up is “We will schedule a technician to visit your residence.”
Step 1a: Repeat calls or Power issues
Don’t laugh. I literally had to have repeat calls with Comcast to investigate the issue. They would attempt to “flash” my modem or “send a signal” to my modem to correct the problem. I have no idea what they did in these situations but it generally meant you had to end the call and monitor performance for a few days and call back if there was a repeat. On one call I got a tech who asked me if I had a UPS (uninterruptable power supply) connected to my Cable Modem and my WiFi router. I replied no which was the honest truth; I’d always had been thinking of getting one but I hadn’t yet. The tech explained that power fluctuations can result in cable modem issues and recommend I install a UPS. I did as was told and purchased an APC Back-UPS NS 1250 (used) from Goodwill for like $30 USD. The batteries were of course spent on the unit I received so I purchased new batteries online for approx $45 USD. The unit has a nice LCD display and it “cleans” the power signal to your sensitive electronics as well as providing a short term battery backup in case of power issues. This did not resolve my issue and I had to call back after the UPS was installed and the issue reoccurred. Keep pushing for a tech to visit your house…
Step 2: Tech Visit – Part 1
Comcast techs are in a separate division from the customer support team and therefore can only see details that are documented in problem tickets or cases. It’s important to have the customer support representative and/or the Comcast technician to document the issue thoroughly in the ticket for improved hand off between teams. The first Comcast tech arrived in the early Summer and after some quick checks in my backyard, he diagnosed that my cable line from my access point on my house to the demarcation point in my back yard had to be redone. I suppose my dogs had dug a portion of the cable up and compromised the copper wire and shielding. He reran the cable in less than an hour but the cable was laying on top of the grass in the backyard. He explained that another person would contact me in a few days to come and dig a trench for the cable and shield it in protective PVC. This was hot, sweaty work in the middle of Summer and I’m thankful for their service. Now that the wire was safely in the ground, I was sure this would resolve my poor Internet performance issues. It did not… I mean I’m sure it resolved some issues but it didn’t resolve “the” issue.
Graylog is an enterprise log aggregation and management framework similar to Splunk. Graylog, the company, is based in Houston, Texas (yay!) and boasts over 40k installations. What am I trying to accomplish by using Graylog at home? Well, my initial requirement is to collect logs from my network routers and incorporate that into my existing network monitoring using InfluxDB and Grafana. I’m a client of Comcast Xfinity and my network performance has really been poor in mid to late 2020. After multiple calls to Comcast and several tech visits, I’ve setup my own monitoring to “show” Comcast that I’m not getting the bandwidth they are billing me for. Log retention is low on my routers and cable modem (data rolls off quickly), a goal of this project is to retain at least 30-90 days of log messages from all network devices.
I’ll setup Graylog in a TrueNAS Core 12.0 Jail which will be running FreeBSD 12.2 release. The jail configuration isolates the software and configuration from other applications running on TrueNAS and it provides a stable environment with a large storage pool for log retention. In the Jails menu on TrueNAS Core 12.0, select the add button and the wizard will prompt you for input to create the Jail. Name your jail graylog and select the FreeBSD software release, then hit Next. I chose DHCP for my Networking configuration which will allow me easy SSH access to the “host”. Select Next and then select Submit to create the Jail. This tutorial will assume you have an understanding of basic Unix and SSH commands. After the wizard completes, you will want to click on the greater-than symbol in the graylog jail row in TrueNAS to show the jail details including the IP address. In this instance my graylog jail is 192.168.1.32 (take note!). In my network router I configured DHCP to give the same IP4 address to the MAC address for the graylog jail and to resolve the DNS hostname of graylog (so I don’t need to remember the IP4 address)
Test that the jail is up by pinging the “host”
rich@eragon:~$ ping graylog
PING graylog.pavlovs.ky (192.168.1.32) 56(84) bytes of data.
64 bytes from graylog.pavlovs.ky (192.168.1.32): icmp_seq=1 ttl=64 time=0.691 ms
64 bytes from graylog.pavlovs.ky (192.168.1.32): icmp_seq=2 ttl=64 time=0.619 ms
64 bytes from graylog.pavlovs.ky (192.168.1.32): icmp_seq=3 ttl=64 time=0.684 ms
64 bytes from graylog.pavlovs.ky (192.168.1.32): icmp_seq=4 ttl=64 time=0.752 ms
64 bytes from graylog.pavlovs.ky (192.168.1.32): icmp_seq=5 ttl=64 time=0.537 ms
^C
--- graylog.pavlovs.ky ping statistics ---
5 packets transmitted, 5 received, 0% packet loss, time 4006ms
rtt min/avg/max/mdev = 0.537/0.656/0.752/0.073 ms
Step 2: Setup SSH access and a local user
You will need to ssh into your TrueNAS box and use the iocage or the jexec command to remote into the jail on your first access. This is because you won’t have a local user account yet and the SSH daemon isn’t running. SSH into your TrueNAS (mine is named kidney) and type the JLS command to see the JID number of your jail. This will change with every restart so don’t write it down or memorize it. Use the jexec command to remote in.
kidney% jls
   JID  IP Address      Hostname                      Path
    12                  graylog                       /mnt/PavPool/iocage/jails/graylog/root
kidney% sudo jexec 12 /bin/tcsh

We trust you have received the usual lecture from the local System
Administrator. It usually boils down to these three things:

    #1) Respect the privacy of others.
    #2) Think before you type.
    #3) With great power comes great responsibility.

Password:
root@graylog:/ #
You will notice that you are now in a shell (a tcsh shell if you followed my above instructions) in the jail. Please note bash is not installed yet. You will be logged in as root. Update the packages and install bash first; you will need bash when you create your local user. You will also install the sudo package and configure it. sudo allows non-root users to run privileged commands.
root@graylog:/ # pkg update
Updating FreeBSD repository catalogue...
FreeBSD repository is up to date.
All repositories are up to date.
root@graylog:/ # pkg install bash sudo
Now you need to configure sudo by executing the visudo command. This command will edit the sudoers file to tell the system that your local account is allowed to run priveliged commands. Scroll down in the vi window until you see User Privilege
##
## User privilege specification
##
root ALL=(ALL) ALL
You should add a new row by putting cursor under the row with root like above and hitting the i key to insert. Type your user row as follows:
rich ALL=(ALL) ALL
Substitute username rich for whatever your username is. You may wonder that you haven’t created the user yet and that is ok! We will create the user next. Type SHIFT ZZ (that is hold the shift key and then type Z twice) to save the file.
Then, add your local user to enable easy logins as something other than root (not good to remote into things as root). In this example my local login name is rich with unix id of 1000 on all my boxes including TrueNAS <<< this is important. Type adduser to create the rich user with uid of 1000.
root@graylog:/ # adduser
Username: rich_
Full name: Rich P
Uid (Leave empty for default): 1000
Login group [rich_]:
Login group is rich_. Invite rich_ into other groups? []:
Login class [default]:
Shell (sh csh tcsh bash rbash git-shell nologin) [sh]: bash
Home directory [/home/rich_]:
Home directory permissions (Leave empty for default):
Use password-based authentication? [yes]:
Use an empty password? (yes/no) [no]:
Use a random password? (yes/no) [no]:
Enter password:
Next, edit the /etc/rc.conf file and add this line to the end of the file
sshd_enable="YES"
Next, start the sshd service to test that it works
root@graylog:/ # service sshd start
Now, try to ssh into your TrueNAS jail from your localhost
rich@eragon:~$ ssh graylog
Password for rich@graylog:
Last login: Fri Dec  4 18:11:47 2020 from eragon.pavlovs.ky
FreeBSD 12.2-RC3 7c4ec6ff02c(HEAD) TRUENAS

Welcome to FreeBSD!
To make it more secure you can add an SSO component or add ssh keys to each of your jails (i.e. no more typing your password). You should have convenient SSH access to your jail. Remember, with great power comes great responsibility. Also remember that you are no longer logging in as root so you’ll need to run sudo on privileged commands. Sudo should be all setup and we’ll test it in the next step.
Step 3: Install Graylog Packages
Type the following to install the graylog, elasticsearch and mongodb packages.
[rich@graylog ~]$ sudo pkg update
Updating FreeBSD repository catalogue...
FreeBSD repository is up to date.
All repositories are up to date.

[rich@graylog ~]$ sudo pkg install graylog elasticsearch6 mongodb44
Update 14-Dec: Updated post based on comments/feedback. I had made a mistake on the packages I used, which was corrected by a reader.
It may take a few mins to download and install those packages. MongoDB will be used for the graylog configuration only. All log data will be stored in the elasticsearch cluster. These packages are downloaded from FreeBSD fresh ports which is a very extensive software pkg repository. Please note as of this writing in Dec 2020, version 3.3.1 is the latest FreeBSD graylog package available but graylog itself is shipping version 4.0.2 on the graylog.org website.
Step 4: Configure Software
None of the above software will be running after it’s installation. Don’t start the services yet. First, edit /etc/rc.conf to tell TrueNAS to autostart the software when the jail starts. Add these lines to the end of the file.
Next, edit the /usr/local/etc/elasticsearch/elasticsearch.yml file to change a few parameters. Add the following to the bottom of the file and save it.
cluster.name: graylog
Start the mongoDB and the elasticsearch components by typing:
[rich@graylog ~]$ sudo service elasticsearch start

[rich@graylog ~]$ sudo service mongod start
Notice the output of the above service commands, if there are any errors starting the commands it should prompt you. You can check if both services are running by typing a netstat command.
This command shows which TCP ports are being listened to by server processes like mongo and elasticsearch. You will notice that 9200 and 9300 are elasticsearch. 22 is SSHD and 27017 is mongo. If your output from a netstat is similar then you are doing good so far. Now, we need to configure graylog and then start the service for the first time. The graylog config will be in the /usr/local/etc/graylog directory.
This will setup the initial config directory and change the owner of the files to graylog user and graylog group. That user and group should have been created when you pkg installed graylog. If you don’t have that user or group then go back to the package install step and check you did that correctly. Change directory back to /usr/local/etc/graylog and edit the graylog.conf file and ensure the variables are set as such.
The above config parameters are scattered throughout the config file. Your http_bind_address will be the jail ip4 address. Ensure that all those directories like the journal directory exist and are owned by graylog:graylog. Next, set the hashed admin password and seed by running these two commands on the command line.
Edit the graylog.conf file and follow the instructions to paste the password_seed and root_password_sha2 to set those values and then save the file. There are instructions inline in the conf file on the password seed and root password if you are confused. Make sure the file is only readable to the graylog user and group. Now you can finally start the Graylog service
Tail the /var/log/graylog/server.log file to ensure it starts correctly and no fatal errors. It takes a minute or two to startup.
Step 5: Test Jail Restart to Ensure Auto-Launch
If graylog started up correctly, go ahead and stop the jail in the TrueNAS Jails menu. Click the Edit Jail menu item under the graylog jail properties and in the Basic Properties sheet you will check the Auto-start checkbox and click save. Next you can click the start button on the graylog jail and wait a few min for everything to start up. You then should be able to access the graylog UI at http://<your ip address>:9000 (please note that you need to fill in your ip address and it will be different than mine.)
Further tutorials will include hardening + adding SSL and configuring syslog inputs.
Asus WiFi routers are great! … says the guy who owns two and just bought a third on Amazon yesterday. I’m not one to waste old hardware and I was thinking that I’d like to flash my old Asus routers with the DD-WRT firmware so I can transform them into WiFi-Repeaters!
Savvy readers will say, “But Rich, Asus already has AiMesh technology to do that. Why do you need DD-WRT?“
My response. “AiMesh only works on recent Asus models, it doesn’t work on my N66R for instance. DD-WRT works perfectly fine and breaths new life into that obsolete model”.
So now that we have established why we’d want to do this, let’s roll up our sleeves and get to flashing….
dd-wrt router database
Step 1: Do Your Research
Flashing the firmware of a WiFi router is not trivial; first and foremost you need to visit dd-wrt.com and see if your router is supported. Search the router database for your manufacturer model (e.g. asus). Some WiFi routers have multiple (confusing) retail names for the same hardware and some retail names have multiple different hardware revisions! Check the serial number and the hardware revision indication on the label of your WiFi routers, my RT-N66U is hardware revision B1. Checking the router database, my hardware revision from 2011 is supported and a fresh firmware file as of 2019!
Save the .trx firmware file to your Computer
Step 2: Download the firmware file to your desktop or laptop
You need to prepare by saving a copy of the .trx firmware file to your local computer (desktop or laptop) that you will use to flash the WiFi router. The file is not very large; about 22 Mb in this example. Please note there are various build numbers in the pulldown combo box. I chose the latest file. You can download multiple .trx files from different builds, but make sure to take notes of which file is which so you aren’t confused later.
Step 3: Read the flashing instructions at least twice
Remember the old Carpenters saying, “Measure twice, cut once”. Flashing the firmware of a router is a bit like baking a cake; you need to follow a list of instructions precisely or the end product will not be good (edible?). In my instance, the first line of the instructions says “Note that the two existing hardware revisions, “A1” and “B1”, of this router are significantly different. This page is about revision “A1”, typically referred to as RT-AC66U, without the revision. For information about the “B1” revision, see Asus_RT-AC66U_B1.” Now, I follow the new link to updated instructions and I see hardware revision A1 and B1 instructions are radically different. I notice the next block of bolded text, “it is recommended that you flash an RT-AC68U build. RT-AC66U builds are optimized for revision A1 and will not work with this router.” Wow, I was really lucky there. I could have ruined this router by flashing the wrong firmware that I downloaded in the previous step. I follow the updated instructions to download the AC68U firmware file.
Step 4: Connect your computer to the Wifi router to flash the firmware
You will most likely do this step several times before you get it right. Follow the linked instructions, steps 1-14. Make sure you are not rushed and I always like to have a bit of music playing to help keep stress levels down. Steps 1-4 are simple, please remember to disconnect from any other WiFi routers and connect a cat6 cable from your computer to the router you want to flash. Make sure you connect to the LAN port, not the WAN port. Steps 5-9 explain how to put your Asus router in “rescue mode” to enable the flashing of firmware. While there is a firmware flash mode in the typical Asus menu, it will not allow you to flash a 3rd party firmware like dd-wrt. If you followed the steps correctly, your power LED will be flashing slowly and 192.168.1.1 will show a simple webpage entitled ASUSTek – CFE miniWeb Server. Step 10 tells you to “Restoredefault NVRAM values” and step 11 prompts you to browse for the .trx firmware file on your computer and click upload. It will take maybe a minute or two to transfer the file at which point the webpage will say flashing the firmware, please wait a few moments. I asked how long are a few moments? It says the router will reboot when complete. Be patient, wait at least 15-20 min to let the firmware file flash and you’ll know when it’s done when the router reboots and the power light goes solid (no blink). Now, I used the AC68U firmware file like the instructions warned me to do but that didn’t work (I tried 3 times). On a lark I used the n66u firmware .trx file I originally downloaded and it worked like a champ! go figure….
Configure your new router
Step 5: Configure your newly flashed DD-WRT router
After the router reboots from the flash, connect via your PC which is still connected via the CAT6 cable to http://192.168.1.1 which is the default IP address for your WiFi router. You might also see a WiFi SSID of dd-wrt on your network. When you first connect you will be prompted to choose a login name and password for your router. Make sure you don’t forget these as they are the admin credentials. For me, this router is a second router on the network (i.e. it’s not my primary router). If I was try and connect it to my main network, I would get an IP address conflict for 192.168.1.1 which is the actual IP address of my primary router. In the setup tab in the Network Setup section I changed the routers IP address to 192.168.1.2 and set the subnet mask to 255.255.255.0. I set the gateway to 192.168.1.1 and I set my DNS to 192.168.1.133 (which is my pihole server << more on that in another blog post). I disabled the WAN connection type and gave my router the name lung (you see my primary router is always named heart). I hit save and apply settings and I believe the router restarted. I can now plug this router via CAT6 cable into my primary router to check that they happily co-exist.
Step 6: Setup the WiFi repeater
AiMesh and DD-WRT WiFi repeater mode essentially allow you to extend your WiFi coverage and you can leverage one band (2.4 GHz for example) to do the bridge and rebroadcast on another band. There are so many combinations here I’m not entirely sure which one is best. I stumbled upon a great Youtube channel called Behfor that walks you thru the what’s and the why’s of your WiFi router and setting up the repeater. Look for the video entitled Dual Band DD-WRT Repeater Bridge. I’m still playing around with this part 😉 Let me know if this was helpful or if you are using WiFi Repeater.
My kids love to play Minecraft; it’s a fun game that has remained extremely popular for a decade (a rare feat). Everyone in the family has an account and much of the fun of Minecraft is playing together in a shared world. I will teach you how to setup shared worlds (and back them up) using MineOS software on FreeNAS / TrueNAS.
Step 1: Install MineOS FreeNAS Plugin
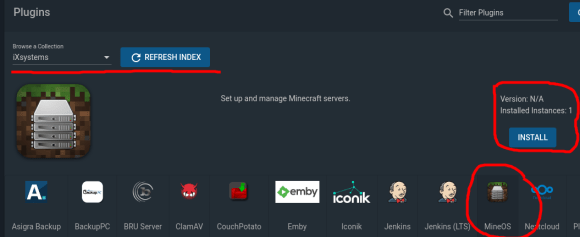
The folks at IXSystems must be big fans of Minecraft because they packaged a Minecraft server solution along with backup utilities and Plex. MineOS is a free plugin to allow you to host Minecraft servers on your FreeNAS box. Within Plugins menu item on FreeNAS web GUI select MineOS and select INSTALL. Give it a name, I chose mineos and select plugin details >>> mostly select DHCP vs. NAT for networking. DHCP will create a fresh Jail, use DHCP to configure networking and install the MineOS software.
If your plugin installation is successful it will look similar to the above image. Note the IPv4 address and click the Manage link to be redirected to the MineOS login page. The default username is mcserver and the default password is mcserver.
When you login, you should see a web GUI similar to the above. In this example I have two (2) servers running. Your example will show no servers running (which is totally ok!). The Dashboard link (circled above) will return you to this menu for any point in MineOS.
Why MineOS?
MineOS is an open source project from William Dizon (looks like it’s been around since 2010). Essentially a Web GUI for administering your Minecraft servers along with utilities to backup and upgrade your world. It’s useful to move an server or daemon process off you local host or laptop to provide improved resiliency and uptime and allow for dedicated resources. You can also setup port forwarding on your wifi router along with a dynamic dns name to allow folks from outside your local area network (LAN) to connect to your Minecraft server. MineOS also allows you to upgrade your world from various versions of Minecraft releases and try out new exciting systems like direwolf and feed the beast (more on this later).
Step 2: Download Server Profile Jars
Minecraft Java Edition is packaged and released as Java Archive (JAR) files from Mojang.com. Your Minecraft launcher application on Windows, Mac or Linux will automation this download when you select the game version. In MineOS you will need to click on the Profiles menu item (on the left), select Mojang from the ID column and then click the Green Download button. You know that you are successful if you see the check and Downloaded next to the Jars you requested. Be careful and do not try and get every Jar at once; the Web GUI doesn’t have a throttle.
If you have errors Downloading Server Jars, do the following:
Stop and Start the Mineos Jail in FreeNAS. Sometimes, I’ve seen it where the networking (to the outside world) doesn’t work correctly the first time. I don’t think this is a problem anymore but worth trying.
Make sure you know where Mineos is trying to save those Jars and that you have write access and enough space. We’ll get into customizing where these Jars are saved in a later article.
Step 3: Create Your First Server
Back on the MineOS menu, please select the “Create New Server” menu item. You will be presented with a dialog to name the server; I chose the name of server01 (boring, I know). All fields with light-gray text will default to those values, i.e. the port will be set to 25565 (which is the default for Minecraft). You might want to change the Level-Name to something interesting. Set the difficulty and gamemode and click create new server. Please note it doesn’t actually start the server yet (we’ll do that next) and most if not all these items can be changed with the exception of the server name.
Step 4: Start Your First Minecraft Server
In the MineOS web GUI go back to the Dashboard and select the server you created.
The Server At A Glance dashboard is very informational. If the server is down, as it will be initially, the server status will be RED. In the Server Actions box, you need to choose the Minecraft server profile you downloaded from Step 2 (in this case 1.16.3). You should ensure that broadcast to LAN and start server on boot checkboxes are checked. In the Java settings you need to select the JAR file from Step 2 (in this case minecraft_server.1.16.3.jar. I like to set the max Java heap (memory) size on the Java runtime to between 1024 and 2048 Mb (1 to 2 Gb). -Xms means minimum Heap size; it’s ok to leave that blank.
Then click Accept EULA and click start to run the server.
If all goes well your Server should show up on the status page and if you click on the latest log link on the left you should see something similar to the below
In your Minecraft Java client you should select Multiplayer and add the server IP that your MineOS is running on to connect to the server (in this case 192.168.1.12). Once you connect, the latest log will show a connection log message for each player. Enjoy!
I’ve been a loyal TiVo customer for more than 16 years which feels awkward to type. TiVo never really cracked into the mainstream, it has always been a premium product and it has since gone thru many acquisitions and CEOs in recent years. I currently own a TiVo Bolt and several TivoHDs. The TiVo is a DVR (Digital Video Recorder) which is a market they practically invented along with a competitor named ReplayTV. I’m not a heavy television watcher but I do watch sports and particularly NHL Hockey. The TiVo can setup a “season pass” on a particular sports team and record all games (i.e. Dallas Stars). My TiVo Bolt has a 500 GB internal HD which is capable of holding many dozens of shows; the Dallas Stars are on a historic Stanley Cup run and I wanted to archive some games for watching later / posterity. The TiVo has native Plex App support so I wondered if I could pull the recorded MPEG shows off the TiVo and archive them in a Sports Plex Library on my FreeNAS server(which has many TBs of storage and ZFS!).
Update 25-Oct-20: The Dallas Stars lost the cup to the Tampa Bay Lightning in 6 games. It was exciting hockey and I’m sure glad I have the series on my Plex. I’m excited for next season, looks like we’ve signed most the team back with the exception of Corey Perry and Matthias Janmark.
Step 1: The Fair Use Doctrine
Am I legally allowed to record and save a show from my TiVo to the Plex? Accord to the Fair Use Doctrine the answer is yes.
I can legally record a broadcast TV program (from a Cable TV feed I pay a monthly fee for) on a recording device such as a Video Cassette Recorder, Digital Video Recorder or computer for my personal use. Recording programming for later viewing is called “Time Shifting” and is a legally supported act. I can view the recorded content as many times as I want, I can make additional copies of the recorded content and I can distribute copies of the content to other people in person. Educational uses of recorded TV content receive additional protection. It is legal to record a TV program and play it for a class. I can also edit and parody the recorded content as long as the new version adds new value (insight, understanding, aesthetics) to the original.
I can’t hold public exhibitions, rebroadcast, distribute on peer-to-peer networks or sell a TV broadcast recording. Fair use does not protect mass distribution of recorded content or the ability for a person to make a financial profit from a copyrighted recording.
The TV recording copyright laws for the U.S. are rooted in the Sony Corporation V. Universal City Studios court case–commonly known as the beta max case. The Supreme Court determined that “video tape recorders” did not infringe on the TV programming copyrights and the potential financial loss to copyright holders from TV recording would be negligible. The case made it legal to produce and sell TV recording devices and for people in the U.S. to record TV programming.
Step 2: How Do I get my Shows off the TiVo?
Let me introduce you to a wonderful little piece of software called pyTivo. This open source software which is not affiliated in any way with TiVo, Inc provides similar functionality to the TiVo Desktop software for Micro$oft Windows and Apple Macintosh. Namely this software allowed you to push and pull MPEG video files from my TiVo and I have been a happy user for over 10 years. The software runs on a host (or a NAS or wifi-router) on your local area network and listens via multi-cast IP for connected TiVo devices. The software is very simple to install and very light requiring only Python, ffmpeg (to transcode) and the tivodecode utility to decrypt TiVo video files. I setup a Jail on my FreeNAS 11.3 server where I wanted to install pyTivo. I had previously setup a share called sports on my medialibrary directory on my NAS pool. I kept the sports folder seperate from Movies or Television on the Plex and in the medialibrary since Plex expects a certain naming structure for Television shows or Movies. I installed the required software:
rich@kidney$ pkg add ffmpeg git tivodecode
rich@kidney$ cd ~/
rich@kidney$ git clone git://repo.or.cz/pyTivo/wmcbrine.git
rich@kidney$ mv wmcbrine pyTivo
rich@kidney$ cd pyTivo
rich@kidney$ cp pyTivo.conf.dist pyTivo.conf
rich@kidney$ vi pyTivo.conf
rich@kidney$ ./pyTivo.py
Step 3: Configuration of pyTivo and First Download
Jot down the IP address of the Jail you configured in Step 2. Fire up your favorite web browser and head over to that address and port 9032 (which is the default, you can change this). The pyTivo user interface is very simplistic. It will initially only show you a Settings link which you must configure for first use.
I’ve circled the most important settings and how I’ve configured them. The paths to ffmpeg and tivodecode and tdcat binaries must resolve. You can test the fully qualified path names to those binaries on the FreeNAS ssh command line. Please note that I compiled a fresh version of tdcat and tivodecode from wcmcbrines git repo as the stock FreeBSD tivodecode binary seg faulted for me. I set my beacon address to the multi-cast for my local subnet and I ensured that my FreeNAS box was on the same local subnet as my TiVos. The togo_path is important. This is where all shows downloaded from the TiVo will be saved local to the pyTivo installation. As previously mentioned I created a sports mount point to my medialibrary share on my ZFS pool. Lastly, I filled in the TiVo MAK (Media Access Key) for my particular account. This is a secret key used to decrypt shows recorded on my personal TiVo — Do not share this key! You can find your MAK on tivo.com when you login to your account. Save changes and restart your pyTivo to ensure changes take affect. Make sure on the command line that pyTivo.conf has been updated with the information you input in the Settings menu. When you restart pyTivo you should see a listing of your TiVo’s and if you input a correct MAK key then you should be able to connect and browse a listing of shows on the Tivo.
If you click on a folder you should see a listing of shows with a description of each one along with the runtime, the file size and the date it was recorded. The exclamation point next to each show means these shows will be deleted shortly as needed for space. Remember: I only have a 500 GB model…
So, each Dallas Stars hockey game is 3.5 to 4 hours and it’s about 7 GB of 720p video recorded at 4 Mbs. I can of course play around with how this is recorded on the TiVo Bolt itself but this seems to be a good compromise of space/size vs. quality. Honestly I want to avoid any transcoding and just focus on decrypting and downloading to the NAS.
Click the check next to each show you want to download and check the bottom boxes to decrypt, save meta data and transfer as mpeg-ts. As far as I understand the mpeg-ts doesn’t transcode and just copies the raw file from the TiVo.
Rename each file and add .mpg extension; the text file will contain meta data for the video.
Quick Update 23-Sep-20: You don’t need to rename the file extension to .mpg for the Plex file scanner to “see” the video files. Just make sure the file permissions allow Plex at minimum to read the file. A simple check of chmod 777 could help spot if that is the issue. The file will come into Plex with the default filename as the Title. You can “enrich” this information manually in the Plex UI if you wish. Plex seem to take 3 or so stills from the video file to use as the poster in Plex. These seem to be fine for me in most cases.
Step 4: Add Tivo function user to run PyTivo Jail
In the FreeNAS web console, select Accounts and Users and click on the Add button. Fill in the new user details, in my case I created the user tivo and most important set the UID (user id) to a unique number higher than 1000. In my case I chose uid 1010. Next set the group for the tivo function user to something that you use with your media, in my case the media group. You can setup a home directory if you wish (it’s not necessary). Click save to create that user.
Ssh into your tivo FreeNAS Jail using the following command
root@kidney$ jls tivo
root@kidney$ sudo jexec 8 /bin/tcsh  <<whereas 8 is your tivo jail id>>

root@tivo$ whoami
Now that you are in your Tivo jail as a the root user which you can see from the command line. Users and groups created within a FreeNAS jail are only visible in that jail. Meaning you can create users here but they are unique to that jail and are not in your overall FreeNAS system. But, you can create a new user in the jail and use the same UID and GID as the users and groups you setup in the overall FreeNAS system. That way any file saved will show tivo and group media in both the Jail and in FreeNAS and via shares. To do this run the following commands within the Tivo jail:
root@tivo:/mnt/sports # pw groupadd media -g 8675309
root@tivo:/mnt/sports # pw groupshow media
media:*:8675309:


root@tivo:/mnt/sports # adduser
Username: tivo
Full name: TiVo Functional User
Uid (Leave empty for default): 1010
Login group [tivo]: media
Login group is media. Invite tivo into other groups? []:
Login class [default]:
Shell (sh csh tcsh git-shell nologin) [sh]:
Home directory [/home/tivo]:
Home directory permissions (Leave empty for default):
Use password-based authentication? [yes]:
Use an empty password? (yes/no) [no]:
Use a random password? (yes/no) [no]:
Enter password:
Enter password again:
Lock out the account after creation? [no]:
Username   : tivo
Password   : *****
Full Name  : TiVo Functional User
Uid        : 1010
Class      :
Groups     : media
Home       : /home/tivo
Home Mode  :
Shell      : /bin/sh
Locked     : no
OK? (yes/no): yes
adduser: INFO: Successfully added (tivo) to the user database.
Add another user? (yes/no): no
Goodbye!
In the above instance I had already created a media group in FreeNAS with 8675309 as the group id (I guess I was in a comical mood that day! Jenny Jenny … lol ).
Step 5: Setting pyTivo process to Autostart as tivo user
Update: 25-Oct-20: This one took me a bit of time to figure out. I followed this guide which was written for another python program called octoprint. In the guide they talk about writing an rc script to start the program and in particular to run it as a daemon. I did a bit of tinkering and I got it to work with pyTivo. Please note that pyTivo currently still needs python 2.7.
The rc script with the above content was saved in /usr/local/etc/rc.d as pytivod and I made sure to set the script as executable. I also made sure that pytivod_enable=”YES” is in the /etc/rc.conf file within the Jail. Restart the Jail and check that the process has auto-started and that the process is running as the tivo user. This is really, really important for me as I want all files to be owned by tivo:media on the TrueNAS and I can set the plex user and the tivo user to be in the media group so they have read/write access to those files.
Step 6: Add Plex Library for Other Videos
In your Plex web user interface add a new Video Library, make sure you choose other videos. I named the library sports for NHL and MLB games. In the Plex user interface you can scan for new media files and update the title and other details from the meta data text file. In the Other Videos category it’s really very simple and it doesn’t scan and enrich the filenames. I will need to add a renamer function to add series name and episode number to the filename of the files if I want a more seamless “Television Shows” experience on Plex. I’m still working on that part and I’ll update this posting when I get somewhere with that.
What does the 12z data show? Several models have made slight adjustments eastward today, but the most significant movement has come from the UKMET model, produced by the United Kingdom. This is not the world’s best global forecast model, but it is competitive, and something we often look at. In the case of Laura, it has had some of the best performance to date since tracking began a few days. This meant we have weighted it a little bit higher for this storm.
One of the things that has concerned us is that the UKMET, although an outlier, had been frequently bringing Laura to the central or upper Texas coast. This would have placed Houston, Galveston, and the upper Texas coast on the powerful right side of the storm. However, in a just released run of the model, the storm’s landfall location has made a sizable jump east, from near Corpus Christi to the Texas-Louisiana border: